
Rudimentary Functions
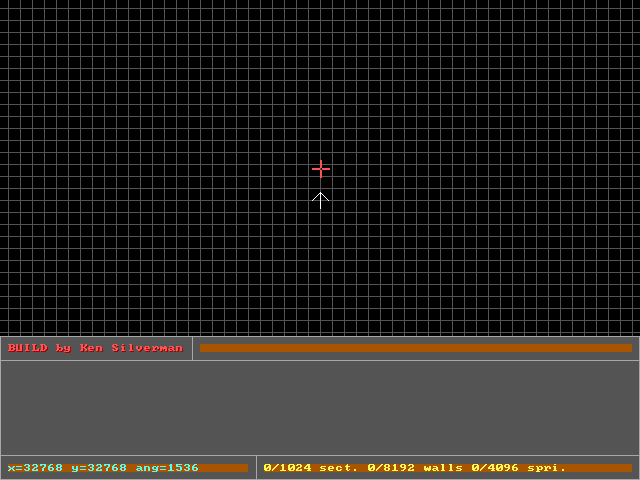
This is the 2D mode grid, which is very similar to a blueprint. The red mouse cursor is used to highlight objects that you wish to edit. The white arrow denotes the current camera position. Basically, that white arrow represents "you". When you hold the Right Mouse Button, the white arrow locks to your mouse cursor and can be moved around.
To zoom in and out, use A and Z. You can use G to cycle through different grid resolutions. There are 6 grid resolutions and a "grid off" mode in Build. There are 8 grid resolutions and a "grid off" mode in Mapster32. Play around with these keys to get the feel of it. There is also a special grid mode in Mapster32 known as "autosize", which automatically adjusts the grid resolution relative to the current zoom distance. I am only describing this special mode for sake of completeness, as I've never personally bothered to use it.
The bottom area of the screen is where you can view and edit information in 2D mode. It always displays your x/y co-ordinates and angle, as well as a collection of object-counters. These track how many sectors, walls, and sprites are in the map, with a maximum value next to each (the original Build limits can be exceeded in Mapster32). If you press Escape, a menu will appear. The options are: (N)ew, (L)oad, (S)ave, save (A)s, and (Q)uit. It's pretty basic. Start a new map, Load one, Save one, Save one with a specific name, or Quit. The default map filename is NEWBOARD.MAP, and if this map file exists in the game's root directory, it will be automatically loaded when the map editor boots. Always save your maps under a different filename to prevent them from being overwritten.
Constructing
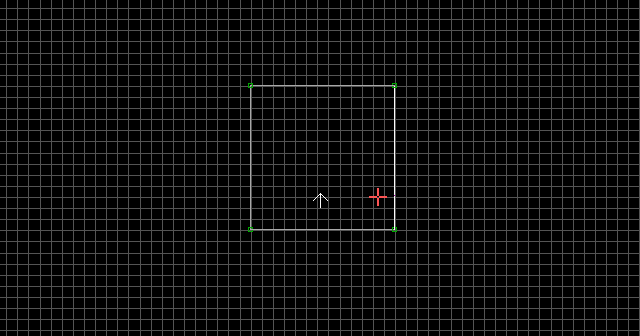
Move the red mouse cursor near a grid point. Press the Spacebar. A little green box called a vertex will appear on the nearest grid point (these have changed colour in Mapster32). Move the mouse around and you'll notice that a white line is now following your mouse cursor. This white line is a wall. While you are drawing these lines, you can use Backspace if you make a mistake and want to reposition the previous vertex. You can also continue pressing Backspace to cancel the line-drawing operation altogether. Use the Spacebar again and continue making vertices in a square shape. When you connect the last vertex back to the first one, the white line will stop following your mouse cursor. This means you just made your first sector.
A sector is just a collection of walls and vertices, and can be any size and shape that you want, although you should avoid crossing lines or making walls extremely long (these will cause problems, and such 'long' walls will appear as a different colour in Mapster32 as a visual warning). You can use the Left Mouse Button to drag a vertex around, in order to reshape a sector. Note that you cannot access the Escape menu, or do anything else, until you either finish or cancel a line-drawing operation in progress.
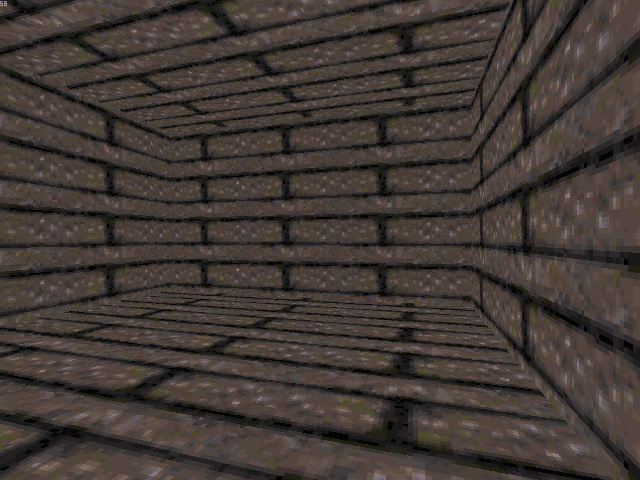
Hold the Right Mouse Button and move the white arrow inside your sector. Let go of the Right Mouse Button and press the Keypad Enter. This will take you into 3D mode. 3D mode resembles the game and is much more entertaining to work with. You are standing inside of your very first sector! Use the Arrow Keys to take a walk around. That little number in the top-left corner (top-right in Mapster32) is the framerate. The higher the number, the faster and smoother the game will play.
Note: If you own a laptop without the standard keypad on the right side of the keyboard, try holding the Fn key and pressing Enter. You should be able to use the Fn key to access keypad functions.

Elevation
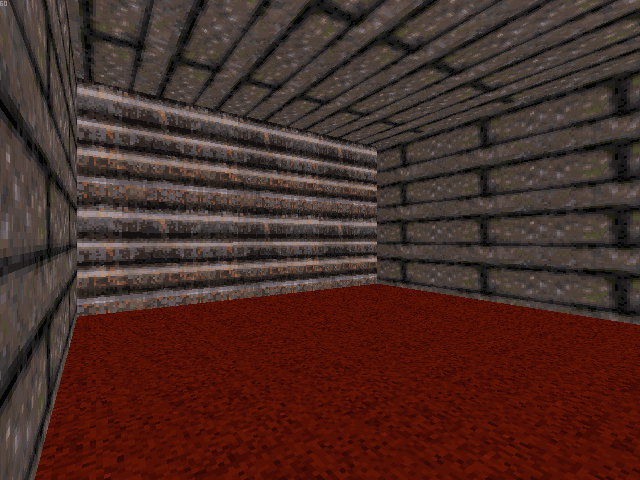
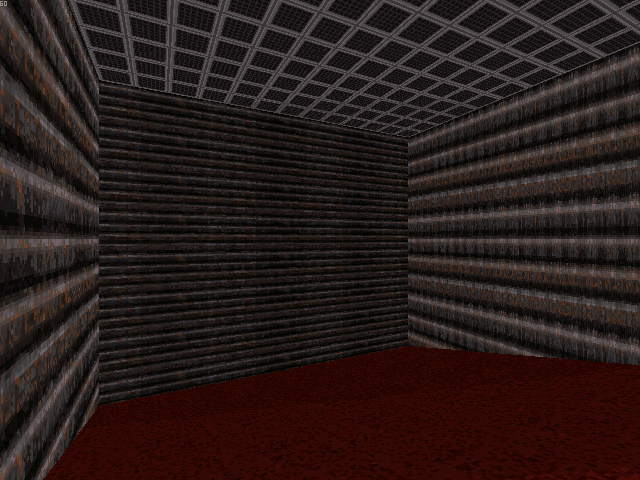
You might want to raise your ceiling a bit higher. This is a very simple process. Point the mouse cursor at the ceiling and press PGUP to raise it, or PGDN to lower it. The same can be done to the floor. If you were to point at the walls and press these keys, the ceiling would be affected. Raise the ceiling until you feel a little less claustrophobic.
Eventually you're going to be making sectors that are so high or low that you have to move up and down to see everything. You can move up and down using A and Z. There are three modes of vertical movement, which are cycled through with Capslock (Mapster32 offers the less-intrusive Apostrophe ( ' ) + Z as an alternative). These three modes are: Gravity Mode, Height Lock Mode, and Float Mode. Try all three modes to get a feel for them. You'll be spending most of your time in Float Mode.
Texturing
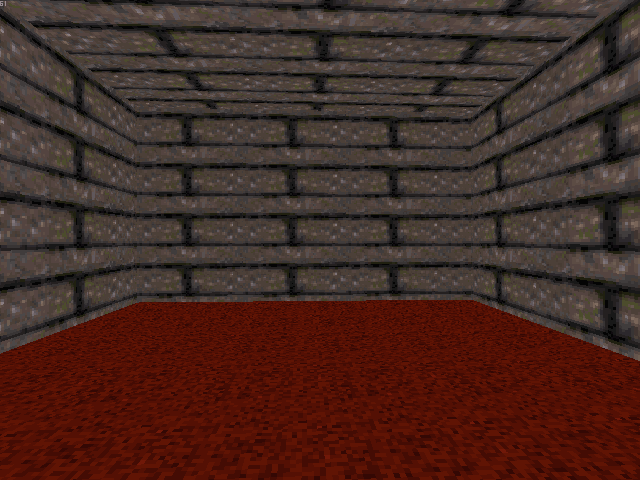
Let's get rid of that ugly brown brick and replace it with something nicer. How about some red carpet flooring? Point your mouse cursor at the floor and press V. Now there will be a black screen with nothing but that brown brick texture. This screen is a list of all the floor/ceiling textures currently being used in your map. If you had pressed V on a solid wall, it would have shown all of the solid wall textures being used. Press V again to get a full list of all of the textures available. From here, you can use the Arrow Keys or the PGUP/PGDN keys to browse through the textures. To get to the red carpet tile faster, press G (Goto), type 899, and press Enter. The list will go straight to texture #899 - the red carpet texture. Press Enter to select it. There, now your floor looks loads better.
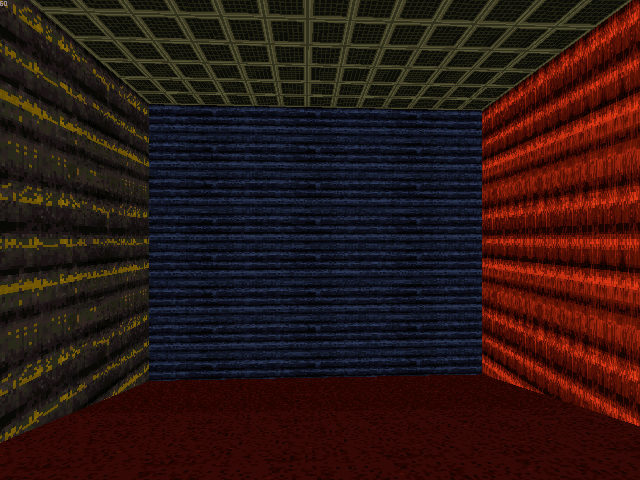
You can texture the walls the same way. Just highlight a wall with your mouse cursor and press V twice. Pick any texture you want. Notice how some textures have a pink colour? That colour signifies invisible pixels in the game, so it is mostly reserved for sprites or masked walls. However, if you were to use it on a solid object (floor, ceiling, or non-masked wall), the pink will appear as black in the game. You'll learn about those later. For now, pick something without the pink colour. You may also notice that some textures have multiple frames. These are animated textures. While it is possible to use any of the individual frames, only the first frame (which should have a name assigned to it) will initialize the full texture animation. Textures with a name assigned to them often have a special function.
Rather than redo this procedure over and over, you can just copy and paste your wall textures to get the job done faster. Aim the mouse cursor at the nicely textured wall and press Tab to cache the texture. Then aim your mouse cursor at each individual wall and press Enter on each one. This will paste the cached texture to all of the walls quickly. Finally, you can texture the ceiling the same way as the rest. Press V twice, then pick a texture. When choosing sector/wall textures, note that only textures with dimensions which are powers of 2 will look proper. For example, 32x64 would look normal, but 31x63 would not. This doesn't necessarily mean that you can't use textures with dimensions other than powers of 2, but floors/ceilings will usually look meshed, and wall textures will usually break at odd intervals.
Parallaxing
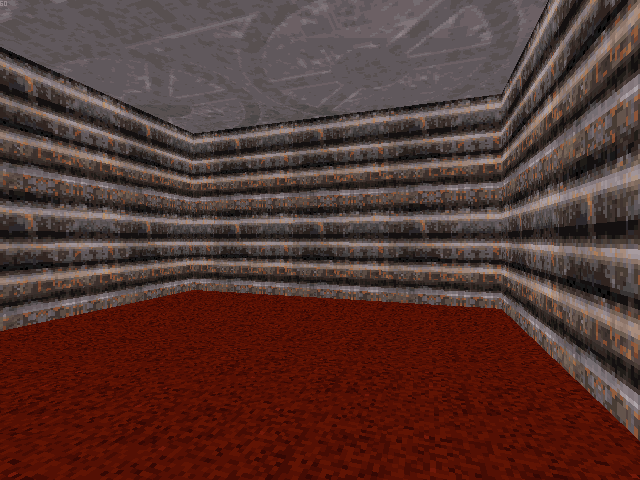
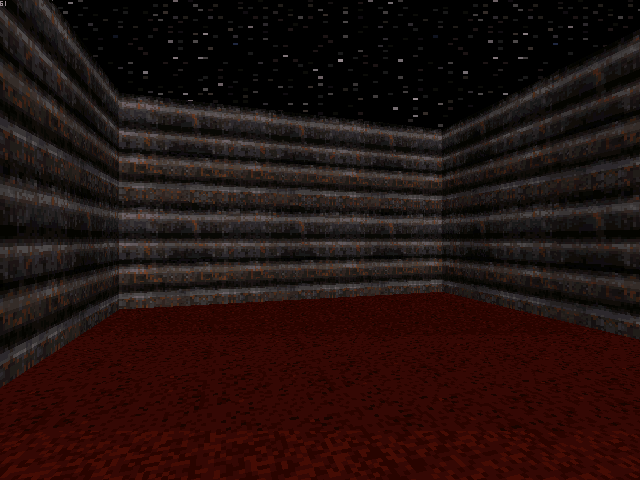
Parallaxing is simple, just think of it as a "sky effect". For a first-hand example, give the ceiling a sky texture (I used texture #97), then simply point at the ceiling and press P. Move around a bit and you'll notice that the texture only moves very gradually relative to the camera, imitating the effect of a real sky. You can actually parallax any texture on the ceiling, but it will probably look strange. It's usually best to stick with a sky texture. Most of the sky textures are near the beginning of the texture list. The floor can also be parallaxed, although it's not recommended to do so in an area where the player can freely roam around (because it would look very unrealistic).

Advanced Functions
To shade an object, aim your mouse cursor at it and press Keypad + to brighten it, or Keypad - to darken it. You could also use Apostrophe ( ' ) + S to shade it manually using numerical values (positive values being darker, and negative values being lighter). I never realized it before now, but the numerical system and the keypresses are contradictory. I recommend ignoring the numerical system for now, just be aware that it exists. Shading adds an extra layer of realism to a map. Over time, you'll learn the methods of shading like a professional, but for now all you need to know is how to use it.
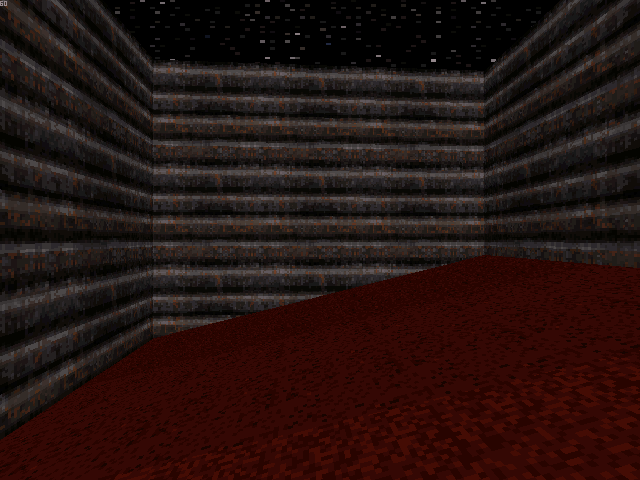
To slope a sector's floor or ceiling, you should begin by assigning the sector's first wall. The first wall will be the axis line for the slope. To do this, point your mouse cursor at the wall which you want to be the axis (you could also point at either the floor just below the wall, or the ceiling just above the wall), then press Alt + F. In 2D mode, you would just highlight the wall (with the mouse cursor on the proper side of it) and press Alt + F. Point at the floor or ceiling and use the square bracket [ or ] keys to slope it up or down. You can see that the axis for the slope is the same wall that you just assigned to be the first wall. Try assigning different first walls in both 2D and 3D mode and sloping the sector to get a feel for it.
If you need to change the size or position of a texture, you can either pan it (shift the texture) or adjust its pixel repeat values (stretch/shrink the texture). Use Shift + Keypad 2/4/6/8 to pan a wall texture, and just Keypad 2/4/6/8 to pan a floor/ceiling texture. You can also use Keypad 2/4/6/8 to stretch or shrink a wall texture. You can't stretch or shrink a texture that's on the ceiling or floor, but you could use E to expand or compress it instead. To flip a texture, use the F key to cycle through all the different variations. There are 4 variations for walls and 8 variations for floors/ceilings.
To change the palette colour of an object, highlight it in 3D mode and press Alt + P, then enter any number from 0-25. Not all of the palette values will actually change the colour of the object. Check the "References - Palettes" section for details. Note that if you change the palette of the floor, any sprite objects in that sector will also change colour in the game (including the player).
You can also toggle the "relative alignment" of a floor or ceiling with the R key. It's not very important now, but it's useful when you learn how to make sectors move around. Relative alignment determines whether or not the floor/ceiling texture aligns with the 'first wall' (which you previously set). You can actually watch this in action by creating a sector with diagonal lines, then toggling relative alignment and setting each wall (one by one) as the first wall.
Another useful tool is the ability to create semi-circles. Switch to 2D mode. Highlight any wall you want and press C. Now move the mouse cursor around and you'll notice a semi-circle following your mouse cursor. You can use the Keypad + and Keypad - keys to adjust its vertex resolution (how many vertices the semi-circle will use). Now you can either press Spacebar to complete the operation, or you can press C again to cancel the operation.
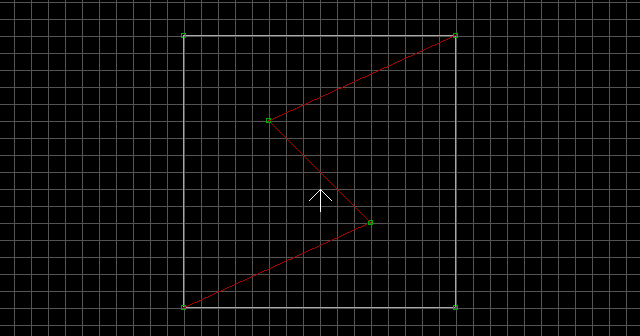
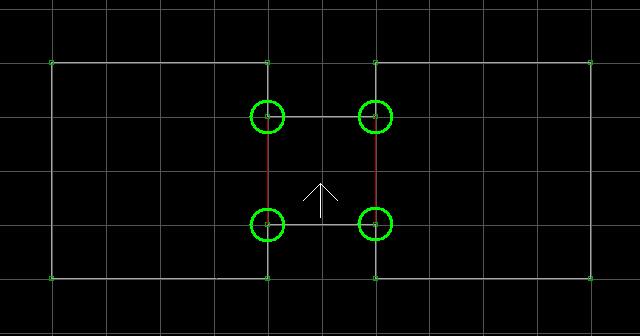
With some trickery, you can extend the functionality of the semi-circle tool to create full circles. Switch to the smallest grid resolution (grid size 6 in Build, or grid size 8 in Mapster32), and create a tiny triangular sector as shown in the image.
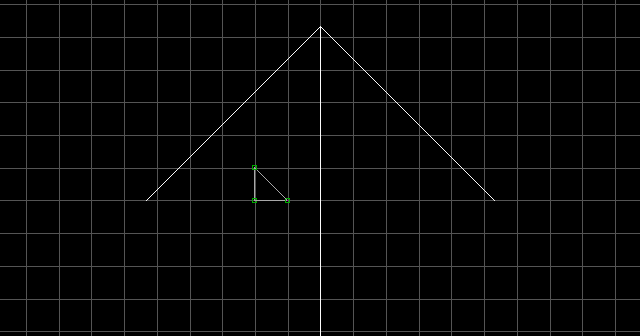
Highlight the hypotenuse (angled wall) of the triangle and press C. Now move the mouse cursor around and use the Keypad + and Keypad - keys to adjust the vertex resolution of the circle. Once you are satisfied with its size and shape, you can press Spacebar to complete the operation.
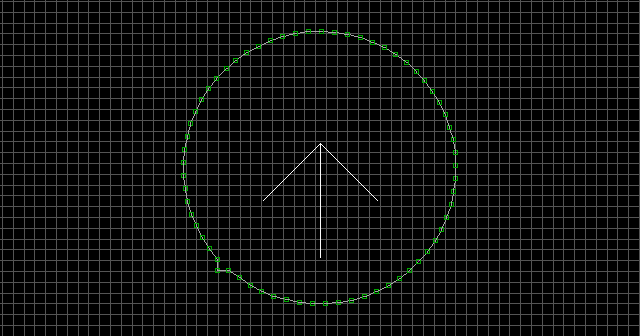
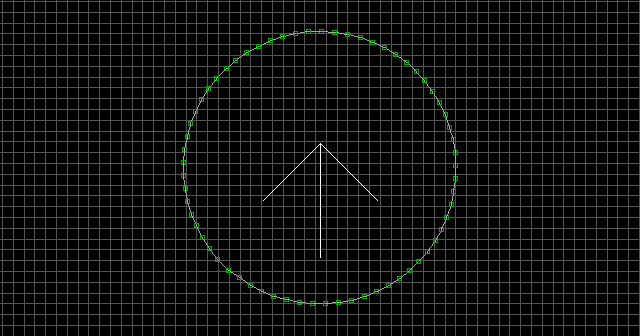
The only remaining step is to remove the extraneous vertex that is jutting out from the circle. Simply drag it overtop of one of its two neighbouring vertices to delete it. There you have it, a full circle. Note that the circle is not "perfect" due to the initial triangular sector, but the imperfection is barely perceptible (in all honesty, a perfect circle is beyond the capabilities of this engine). This is just my own personal method anyway. I have no idea if this method is widespread, or if a better one exists. In any case, this method is both simple and effective.
Valid Player Space
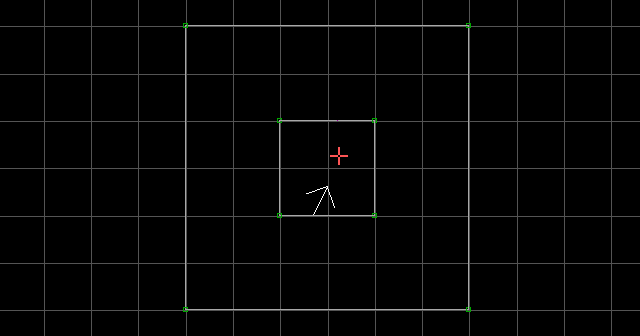
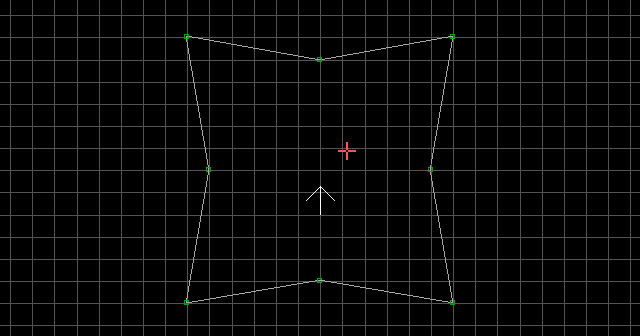
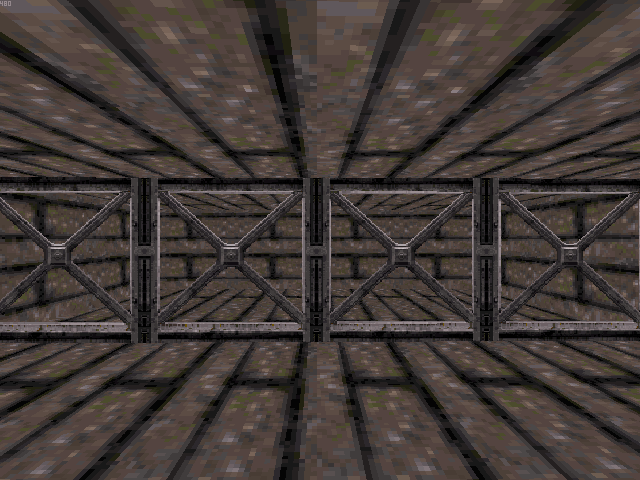
Valid player space can be a bit confusing, but the name is self-descriptive. It just refers to map space that "exists" so that a player can travel within it. I'll try to explain it visually. Here we have drawn a square inside of another sector. This is referred to in the engine as an "inner loop", because technically this inner square is not a sector yet. Recreate this scenario, and make sure you create the outer sector first. In 2D mode, we can tell that the inner loop is not valid player space because of the white lines, and because you cannot enter 3D mode within it. If we enter 3D mode in the outer sector, we can tell that the inner loop is not valid player space because of the column in the middle of the room.
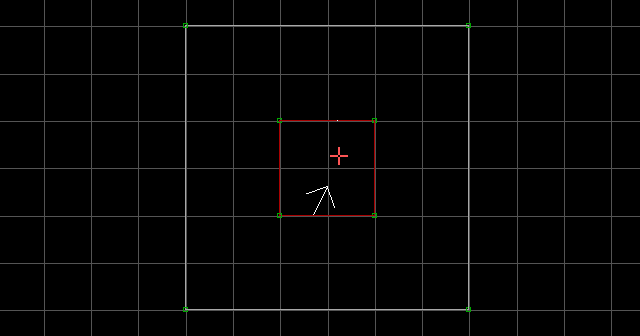
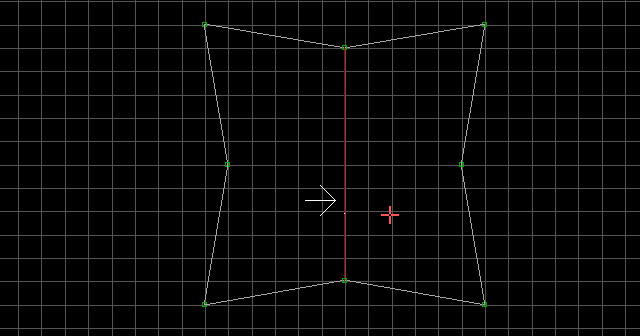
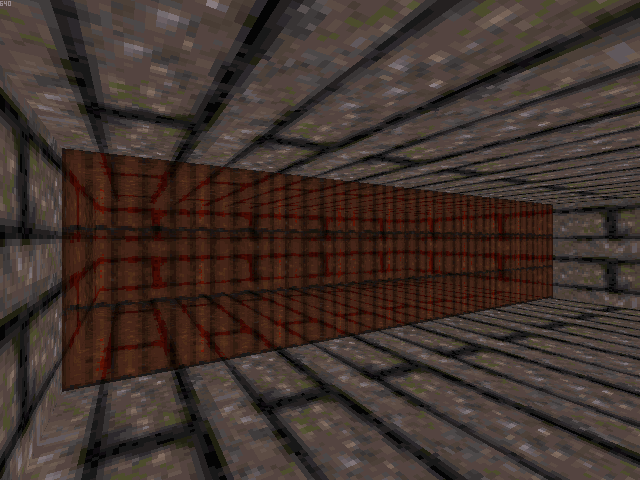
Place the red mouse cursor inside the inner loop. Make sure one of the interior walls is highlighted (it should be flashing). Now hold Alt and press S. The inner loop will become valid player space, and the message "Inner loop made into new sector" will be displayed. In 2D mode, we can see this because of the red lines. In 3D mode, we can see this because the column is gone. These inner sectors go by many names including "island sector", "child sector", "sub-sector", "nested sector", etc, but they're all the same thing.
Now that you have seen an example of valid player space, I can explain white lines and red lines. White lines are one-sided walls, meaning that only one wall exists. The other side is facing invalid player space, therefore no wall exists on that side. A red line is a two-sided wall, meaning that the player can be on either side of that line, and both sides have separate attributes. It's really quite simple, but at first it seems confusing. You'll be using this keypress a lot, so remember: Alt + S turns an inner loop into valid player space. It is an absolute rule that you must always create sectors by starting from the outside and working inwards. Never attempt to draw a new sector that completely surrounds a smaller sector!
Splitting and Joining
Inserting vertices is useful for shaping your sector after it's already been constructed. To insert vertices, highlight the wall where you want to insert, and press Insert. You'll see a new vertex appear on the wall. You can use the Left Mouse Button to drag a vertex around. You can insert as many vertices as you want and pull them around to reshape your sector. Note that if two vertices from the same sector occupy a grid space simultaneously, one of them will be deleted. So if you drag a vertex exactly overtop of another vertex, and both vertices belong to the same sector, one of the two will be deleted. However, vertices from separate (independent) sectors are capable of overlapping without being deleted. You probably won't be dealing with these technicalities for a while, but it's helpful to know about them ahead of time.
If you draw a line connecting two of the vertices, a red two-sided wall will appear. This means you have just split the sector into two sectors. When you are connecting vertices within a sector, do not cross the lines, as it will only cause problems! You may notice that a sloped sector will readjust its 'first wall' after being split with a red line.
You can also draw independent vertices while splitting a sector. After connecting the final wall back to a vertex from the source sector, all of the split walls will turn red. Of course, you can also further split sectors into more than just two pieces. In fact, you can split them into as many fragments as you like, but remember that each split will create a new sector, and it is possible (though unlikely) to go over the sector-count limit.
If you want to join two adjacent sectors which have been split, press J in the first sector, then press J again in the second sector. The two-sided wall will disappear meaning that the two sectors have been joined. The joined sector will keep the attributes of the first sector in which you pressed J. It is very important to note that you should not attempt to join sectors which are non-adjacent (that is, not sharing a line). This isn't really an issue in Mapster32 because there is a protective confirmation message to bring it to your attention, but Build will make no attempts to stop you from doing this. Joining non-adjacent sectors will most likely result in a corrupted MAP file.
Conjoined Sectors
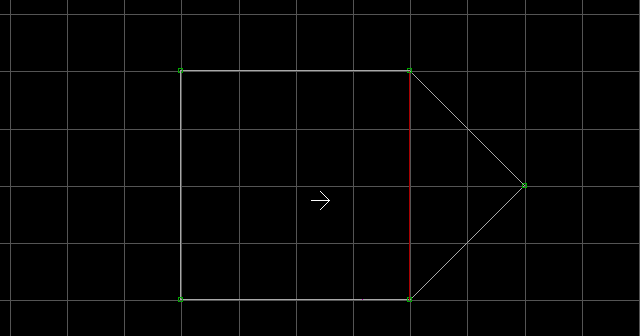
It is possible to create sectors conjoined to other sectors. When you draw a white line overlapping another white line, the overlapped walls and vertices will merge, and the line will turn red after the sector drawing is complete (provided that no vertices were missed). In logical terms, overlapping one-sided walls merge together to form a two-sided wall. The triangular sector on the right was attached to the sector on the left, overlapping one wall in the drawing process (which consequently became a red two-sided wall):
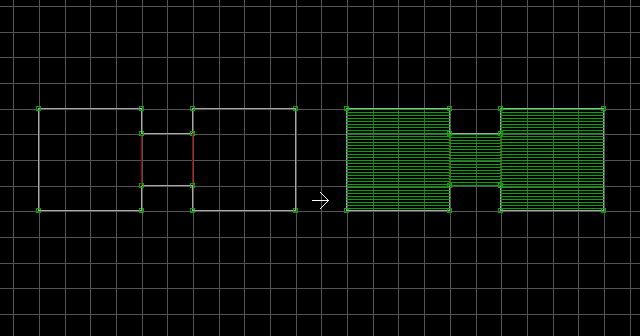
Finally, you're going to learn how to connect independent sectors. First create two independent square sectors. Use Insert to insert four vertices, two on the right wall of the first square, and two on the left wall of the second square (newly inserted vertices are shown as green). Now you can use Spacebar to draw a small "hallway" square connecting the four newly inserted vertices. If you have drawn the hallway sector over the vertices correctly, the overlapped one-sided walls will merge and become two-sided walls.
Various combinations of all these methods allows for very complex and intricate sector designs.
Moving, Copying, and Deleting
To move sectors, hold Right Alt and drag the green box over the sector(s) which you want to move. Once they're flashing green, you can use the Left Mouse Button to drag the sector(s) wherever you want. Press Right Alt again to deselect the sector(s) when you're finished.
To copy sectors, hold Right Alt and drag the green box over the sector(s) which you want copied. Once they're flashing green, press Insert. The message "Sectors duplicated and stamped" will appear, and you can now use the Left Mouse Button to drag the new unit off of the original and place it wherever you want. Press Right Alt again to deselect the sector(s) when you're finished.
To move a group of vertices and/or sprites (or even an entire sector), hold Right Shift and drag the pink box over the objects/sector(s) you want to move. Once they're highlighted and flashing, use the Left Mouse Button to grab one of the highlighted objects and drag the whole unit wherever you want. Press Right Shift again to deselect it. I know you haven't learned about sprites yet, so this will also appear in the sprites section.
It is generally best practice to move sectors by an even number of spaces on grid resolution 1, or twice that amount per grid resolution. This ensures that textures stay in the same alignment, because ceiling/floor textures remain stationary while sectors are moved (except the ones that have relative alignment set with the R key). In the image below, the copied sector has been moved off of the original sector by exactly 12 spaces on grid size 2, which is equivalent to 6 spaces on grid size 1.
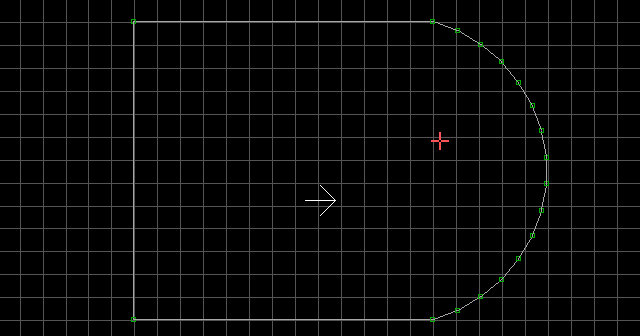
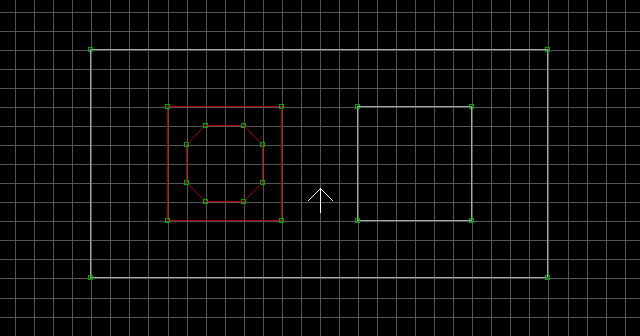
Copying red-lined nested sectors is a bit more complex. The problem is that the exterior walls of the sector will not be copied, hence the red lines will turn white after pasting. If you were copying the sector into null space (independent of any other sectors), this wouldn't matter, but you wouldn't be able to copy a red-lined sector into valid player space. The workaround for this is actually somewhat simple. Before you copy the red-lined sector, you must create a "shell" sector for it to fit into. The shell sector must have exactly the same exterior vertices as the sector you want to copy. For example, the nested sector on the left is the sector to be copied (note that it contains a sub-sector of its own), and the sector on the right is the "shell" sector, which is simply an outline of the sector to be copied.
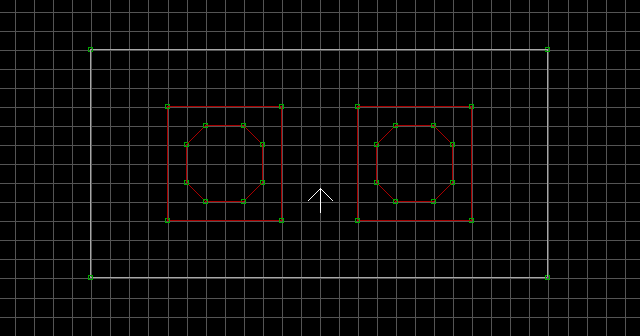
After highlighting and duplicating the sector on the left (using the aforementioned keys), you would simply move the copy directly overtop of the shell sector, then deselect it to finish the operation. When you overlap the copy and the shell outline, the one-sided walls will merge (provided that the shell sector was constructed properly) and become red two-sided walls. Note that the sub-sectors within the copy remain intact. Thus, a complex collection of objects could be duplicated quickly and easily by creating them inside a sector of very few vertices, and then dropping a copy into a shell sector.
Before you delete a sector, you should first delete all of the sprites and tags within it (you'll learn about those in the next sections).
There are two methods of deleting a sector that contains no nested sectors: 1) Highlight an interior wall of the sector with the mouse cursor, and use Right Ctrl + Delete, or 2) Overlap its adjacent vertices, one by one, to fully collapse and delete the sector (make sure the walls are white before doing this!). The first method is preferred.
There are two methods of deleting a nested red-walled sector: 1) Use the sector joining function (J) to join it with the surrounding sector, or 2) Use Right Ctrl + Delete, then overlap its adjacent vertices, one by one, to fully collapse and delete the sector (make sure the walls are white before doing this!). The first method is preferred.
There are two methods of deleting a nested white-walled sector: 1) Use Alt + S to make it valid player space, then use the sector joining function (J) to join it with the surrounding sector, or 2) Overlap its adjacent vertices, one by one, to fully collapse and delete the sector (make sure the walls are white before doing this!). The first method is preferred.
Wall Attributes
Orientating walls is done with the O key (the letter O, not zero). You can orientate walls to either the floor or ceiling. To get a better understanding of what this does, try pressing O on a wall, then use PGUP to raise the ceiling. Do the same thing again to see the difference. This is useful later on when you learn how to make sectors move up and down.
Split a sector in half with a red line. Now switch to 3D mode. Point your mouse cursor just below where the red line would be, and press M. A masked wall will appear. Try changing the masked wall's texture to something with that pinkish colour. You will notice that the pink is not displayed, making portions of the texture invisible.
Masked walls can also be affected by transparency settings. There are three modes of transparency which can be cycled through with T: opaque, semi-transparent, and transparent. You can also mask a wall on only one side by pressing Shift + M instead of M. All of the attributes of a masked wall can still be applied. If you walk through it and turn around, you won't be able to see the other side. A one-sided masked wall can also be made with the 1 key, however this type will be 'solid', meaning that it will not be compatible with transparency settings or invisible (pink) pixels. The pink will instead become black in-game.
If you want to make the wall blocked so that you can't walk through it, you can set the blocking flag by pointing at the masked wall and pressing B. You can press H on it to set the hitscan flag, which allows the wall to be shot by bullets and other projectiles. A blocked wall appears pink in 2D mode, and a hitscanned wall appears thick in 2D mode. B and Ctrl + H are used to set these flags in 2D mode. Note that a masked wall will maintain all of its attributes, even after being unmasked with M. This is actually a pretty important point to remember, because you can no longer see the wall, yet it may still affect the player and/or the environment.
Finishing Up
Setting the default player start position is simple. In 3D mode, move to the exact position which you want to start at, then switch to 2D mode and press Scroll Lock. Your co-ordinates, height, and angle will be saved. After setting the start position, move the white arrow over, and you'll see a brown arrow (Note: This arrow has changed colour in Mapster32). This arrow represents the default player start position within both the game and the map editor.
To take screenshots in the map editor (or in the game), press F12. The new screenshots will appear in the game's root directory.
If you like what you've made, save it. Try to get into the habit of saving every few minutes. You'll be sorry if you don't, after you've lost hours of work due to a crash or somesuch. Use Save (A)s to save incremental versions of your map, in case an idea goes wrong and you'd like to backtrack.
That's pretty much it for sectors. I know it's a lot of information to retain at first, but keep at it and when you're ready to learn more, move on to the Sprites section.