
The Underwater Airlock is a chamber which allows passage between water-filled areas and air. It uses a combination of the Submergible Water and Floor-Rise/Ceiling-Fall effects, as well as a pair of Two-Way Trains for timing. If the older FAQs are any indication, Gijs de Vries may have been the first to come up with this effect. Although it involves more steps, I consider this to be slightly less complicated than his Rising Submergible Water on Sloped Surfaces effect. The sector sizes throughout this demonstration are not crucially important, but the heights and values given are optimised for this specific example. If you deviate too much from the values given, expect problems. After you've built it at least once, you can make your own however you wish.
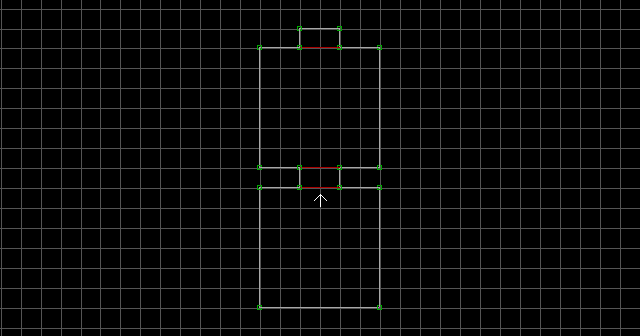
Begin by making the following four sectors. The bottom sector is the air-filled area that the player will start in. The two smaller sectors are doorways. The remaining middle sector will be the above-water airlock sector, which for now I am just going to refer to as the airlock sector.
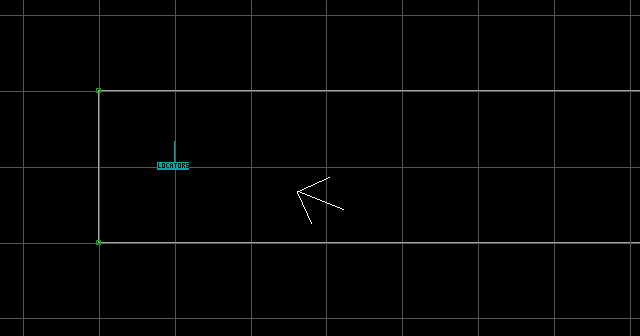
Add the following sprites to the airlock sector: S[0,31], A[0,Channel], Speed[0,Speed]. Make sure the S is angled up. For Speed, we want to choose a value that makes the water rise relatively slowly for realism. We'll use a value of 160, which is the lowest we can go (in this example) without ruining the timing of the effect.
Lower the airlock sector's floor by 12 units, and raise its ceiling by 12 units. You can do some rough texturing of each sector if you like. We'll ignore the dead-end doorway for now.
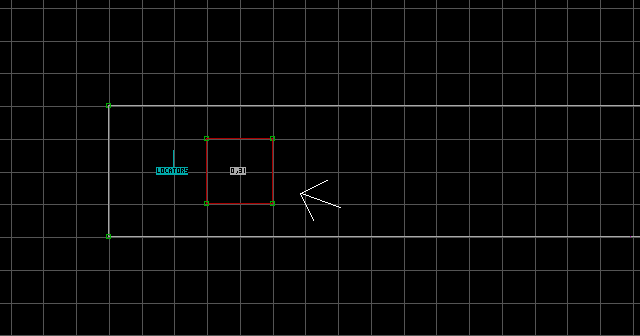
Insert two new vertices beside the doorway and create a new sector, adjoining the sector that the player will start in. This new sector will contain a switch to activate the airlock effect.
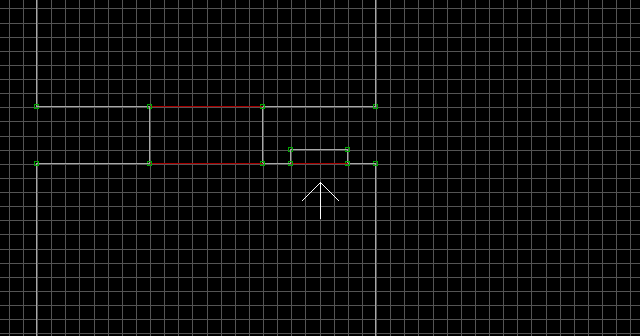
Raise the switch sector's floor by 4 units, and lower its ceiling by 4 units. Texture it however you like. Use the R key on the switch sector's floor/ceiling to make them permanently stay in the alignment you choose. This will save you time later.
Split the switch sector in half, and block the new two-sided wall. Now turn grid locking off with L and move the blocked wall as close as possible to the outer two-sided wall of the switch sector.

The switch sector is going to close as soon as the switch is activated, to prevent the player from activating it again until the effect is completely finished. Add the following sprites to the switch sector: S[0,32], A[0,Channel+1], A[0,Channel+2], Speed[0,Speed] (M[StopSound,StartSound]). Make sure the S is angled up. For Speed, we want our switch door to close fairly quickly, so use a value of 1024.
Use the O key (the letter O, not zero) on the switch sector's inner walls so they won't move with the ceiling. This won't be necessary for the thin sector's walls. Temporarily lower the switch sector's ceiling so you can texture the front of it with some kind of panel or door texture. Personally, I really favour texture #1107. Raise it back up when you're done.
Place a Switch tagged [ActivationSound,Channel] on the back wall of the switch sector. This switch will activate the airlock effect. Now, the bad news is that there are three more of these switch sectors to build. The good news is, we've already built them. We're just going to copy and paste this switch sector from now on, so make sure you are satisfied with how it looks. If you'd like to line up the switch sprite better, go into 2D mode, pull the switch onto a grid point in front of the wall (to line it up), and use the O key on it (the letter O, not zero). This will move it back against the wall.
Insert two new vertices on the East wall of the airlock sector. Space them apart so they are in the middle, and so they are the exact same width as the switch sector (well, technically the thin sector attached to the switch sector). We are going to make a copy of the switch sector and place it here in the next step.

Using Right Alt, highlight the switch sector (including the thin sector attached to it) and press Insert. Use the Left Mouse Button to drag the copy away from the original. Then use the , / . (aka < / >) keys to rotate it so it faces the proper direction (in this case, the switch sprite should be facing West after rotation). Now use the Left Mouse Button to drag the copy so its outer vertices overlap the newly inserted vertices of the airlock sector. Once the copy is in place, press Right Alt to make it stop flashing green. Notice that after copying the sector, all of the sprite angles are relative to their original position. Aside from the switch sprite, you'll have to readjust all of the sprite angles in the copied sector. It is especially important that the S be angled up.
Let's use Right Alt one more time to highlight the newly copied switch sector (including the thin sector attached to it). Now go into 3D mode. You will notice that the newly copied sector is way too high up for the player to comfortably press the switch. Lower the switch sector's floor and ceiling down by 8 units each. The reason we needed the sectors highlighted was so the thin sector's floor/ceiling would move together with the switch sector's floor/ceiling, which makes things easier. You can go back to 2D mode and disable the sector highlighting with Right Alt.
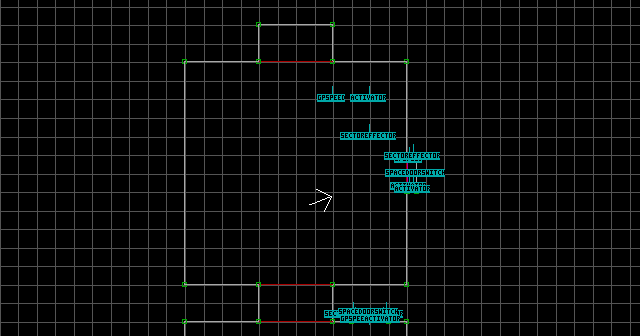
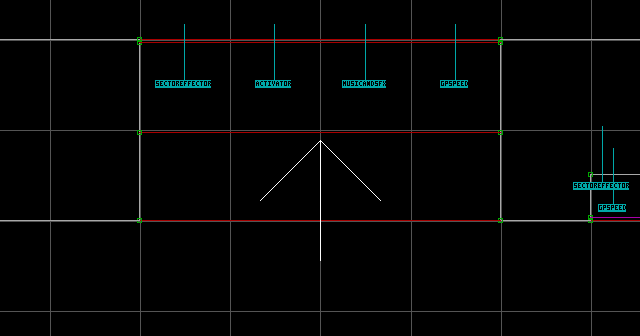
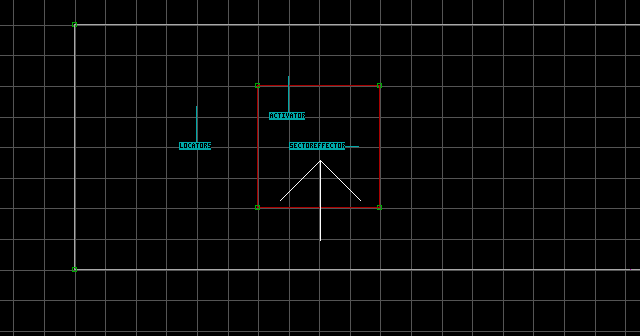
Place an S[Channel+5,7] in the airlock sector, and tag the airlock sector itself [0,1]. From now on, it will be known as the above-water airlock sector.
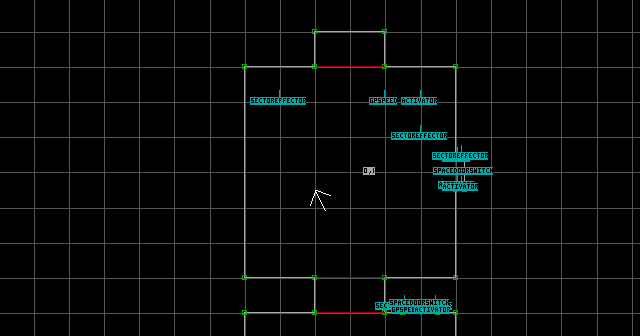
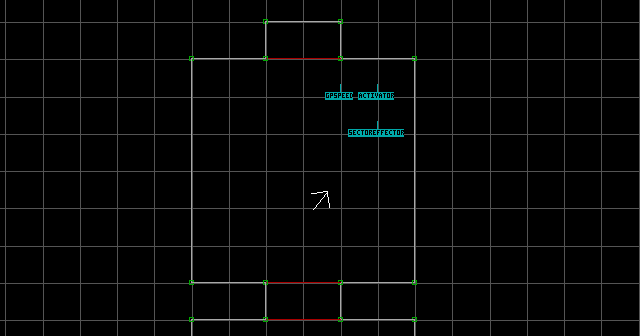
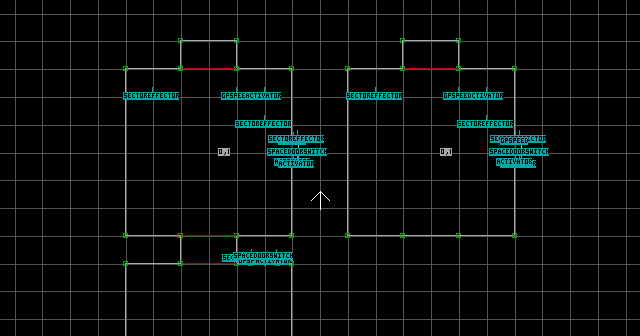
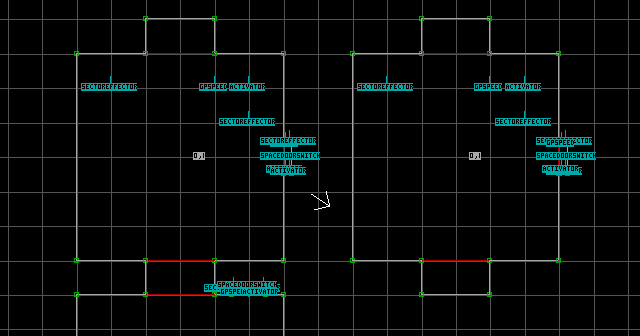
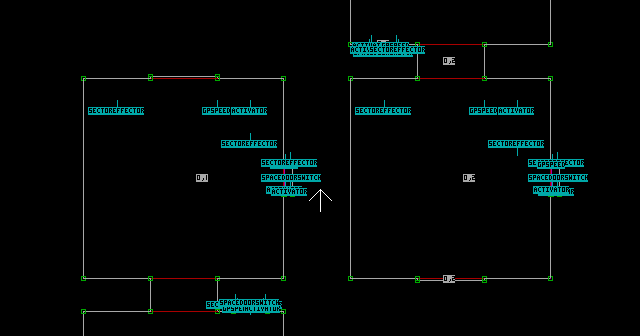
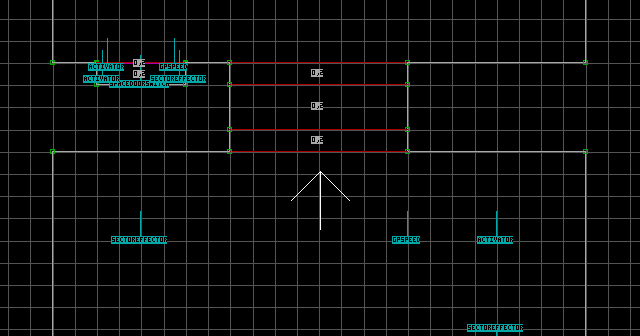
Now it's time to copy the above-water airlock setup. Highlight everything above the lower doorway sector (using Right Alt) and press Insert. Then use the Left Mouse Button to drag the copied sectors over to the right (as in the image below, move the copy an even number of spaces on grid size 1, or twice that amount per grid resolution; This will keep the floor/ceiling textures in proper co-ordination with the above-water texture alignment). Once you've got a copy made, press Right Alt to make it stop flashing green. The copy will now be referred to as the below-water airlock sector.
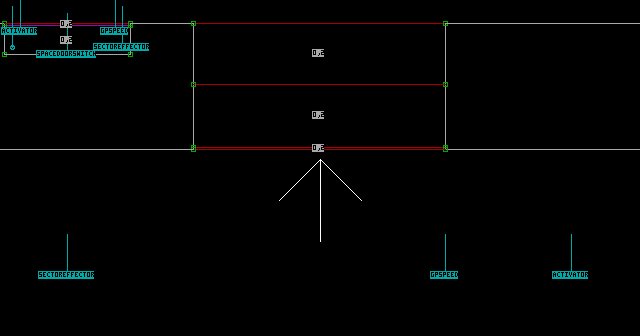
Our copy is still missing a chunk. Highlight only the lower doorway sector from the original setup (using Right Alt) and press Insert. Then use the Left Mouse Button to drag the copied doorway sector onto the South wall of the below-water airlock sector. Once the copy is in place, press Right Alt to make it stop flashing green.
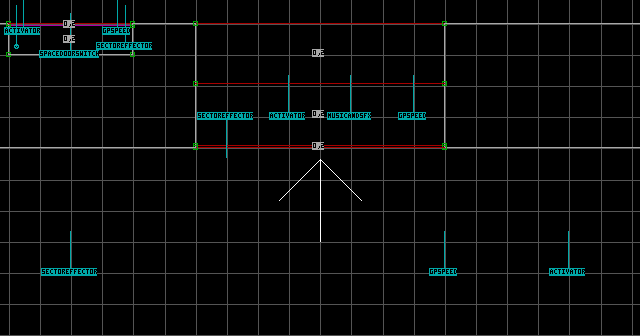
Create a new sector attached to the upper doorway of the below-water airlock sector. This will just be the water-filled room that the airlock leads to.
We're going to place another switch sector beside the doorway in this new sector. Insert two new vertices and space them apart so they match the width of the switch sector (well, technically the thin sector attached to the switch sector).
Using Right Alt, highlight the original switch sector (including the thin sector attached to it) and press Insert. It is very important that you copy the original switch sector, not one of the airlock switch sectors, otherwise you would have to waste time and effort in adjusting the floor/ceiling heights of the copy. Use the Left Mouse Button to drag the copy away from the original. Then use the , / . (aka < / >) keys to rotate it so it faces the proper direction (in this case, the switch sprite should be facing North after rotation). Use the Left Mouse Button to drag the copy so its outer vertices overlap the newly inserted vertices beside the underwater doorway. Once the copy is in place, press Right Alt to make it stop flashing green. Notice that after copying the sector, all of the sprite angles are relative to their original position. Aside from the switch sprite, you'll have to readjust all of the sprite angles in the copied sector. It is especially important that the S be angled up. We're finally done with the switch sectors!
Change the tag of the below-water S[0,31] to S[0,32], and adjust its angle so it faces down. Now tag every below-water sector [0,2] (be sure to change the tag of the below-water airlock sector from [0,1] to [0,2] as well). I tagged every below-water sector, including switch sectors and even the thin sectors attached to them. You probably don't have to go that far, but be sure to at least get all of the large ones.
Texture the floor of the above-water airlock sector with water (#336). Raise the floor by 6 units. Raise the S[0,31] until it is 6 units below the ceiling. This can be made easier by using the Left Mouse Button to lock it first, then raising it until it is just inside the ceiling, then you can lower it back down by 6 units. Remember that the height of a sprite is determined according to its bottom.
Texture the ceiling of the below-water airlock sector with water (#336). Do not just copy-paste the water texture from the above-water airlock sector or you'll overwrite the tag values and your water won't function properly. Raise the S[0,32] by 6 units. Lower the ceiling by 6 units. Notice how the majority of the walls move up and down with the ceiling? We don't want that, so use the O key (the letter O, not zero) on any walls that do this. You can raise/lower the ceiling to check for these walls, but be careful not to lose count and forget how high the ceiling was.
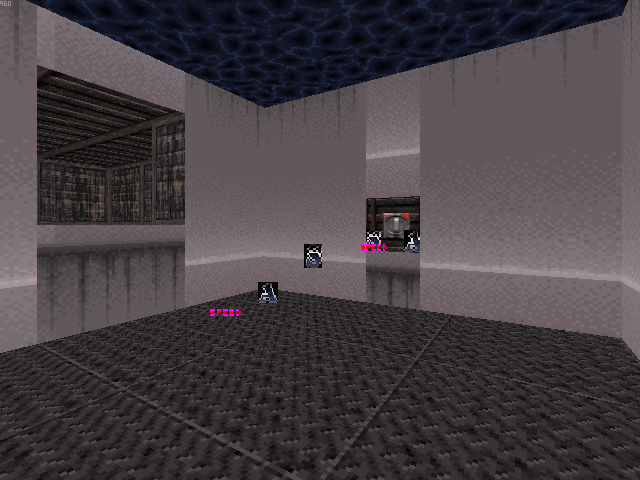
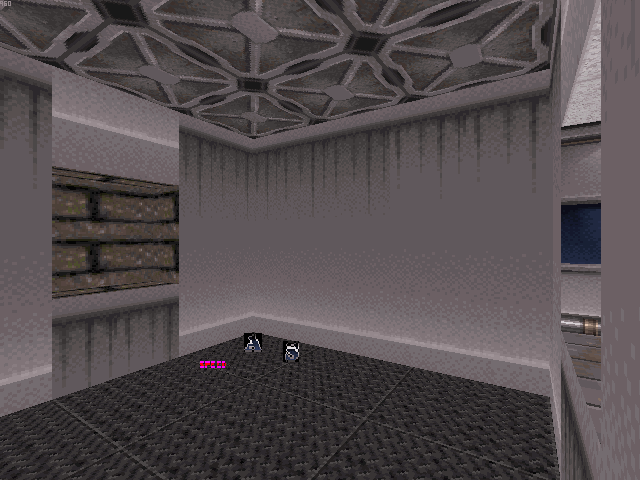
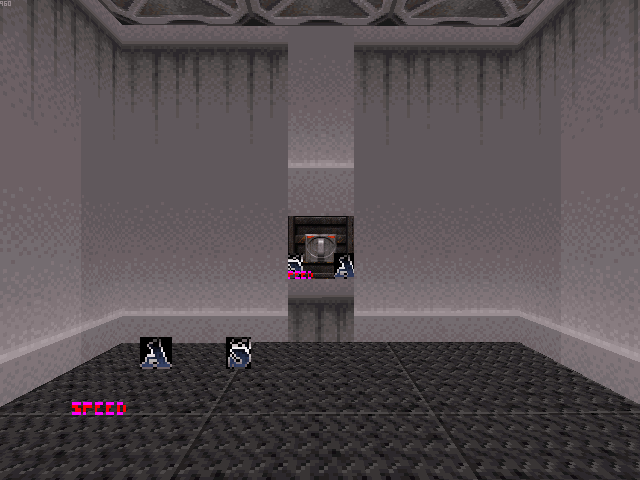
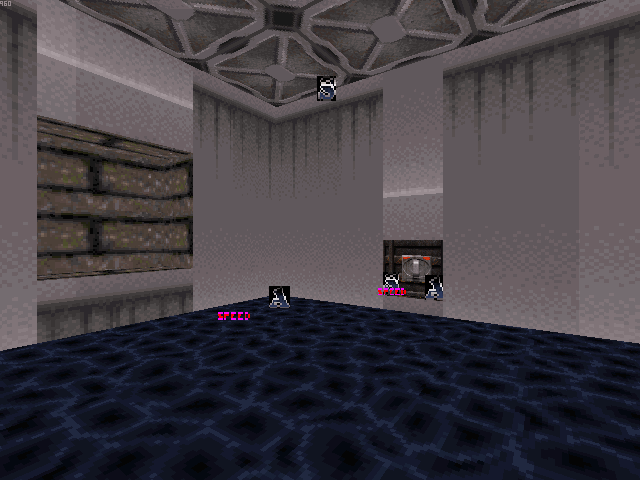
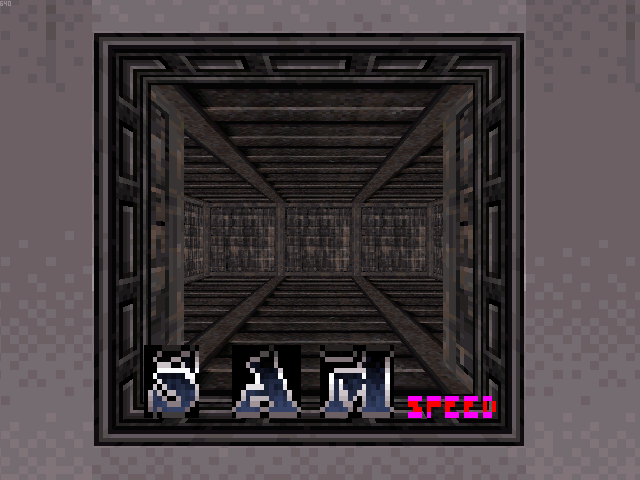
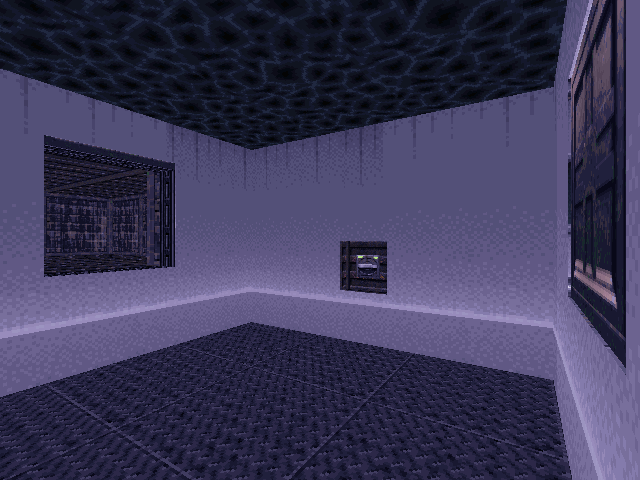
Aside from texture alignment, which we'll do later, we're finished with the airlock sectors. Now we can focus on creating the doors. You may have noticed that there are two useless doorways: one above the water, and one below the water. These doorways go nowhere, and only exist to create the illusion of a single set of doors. In reality, the player teleports between the above/below-water sectors and travels through two completely separate doorways. This means we can turn these two useless doorway sectors into 'fake' doors. Turn grid locking off with L, and make both of these useless doorway sectors as thin as possible.
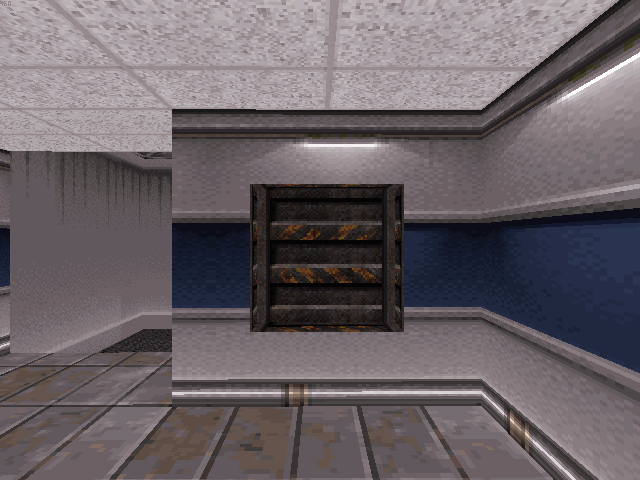
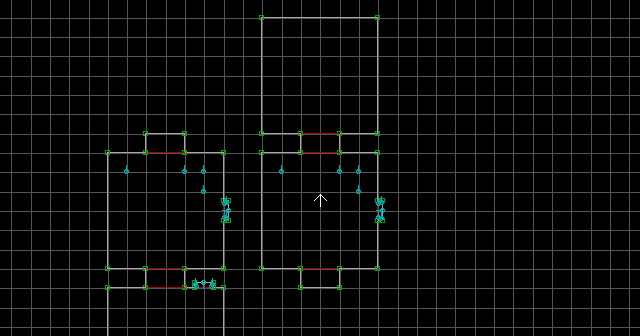
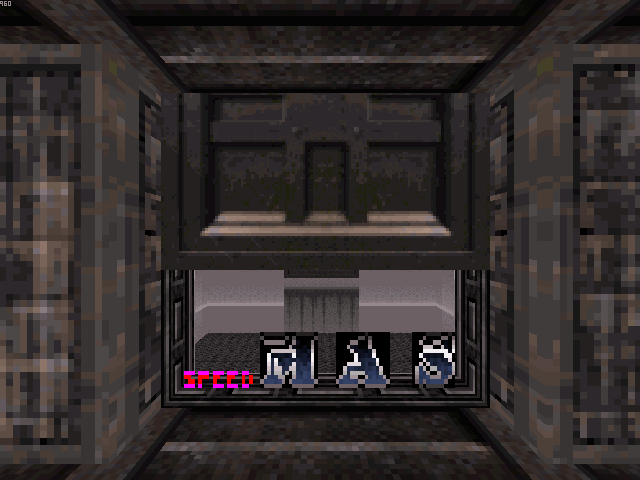
Now texture each one with a door texture. They should both look similar to the image below when finished.

It's time to work on the actual doorways now. We need to create a door sector within each doorway. We'll start with the below-water doorway sector. Split the doorway sector twice to create a door sector within it. I typically refer to this door sector as the 'water' door.
Now use Right Shift to highlight all four of the door sector's vertices at once. Turn grid locking off with L, and move the door sector as close to the below-water airlock sector as possible.
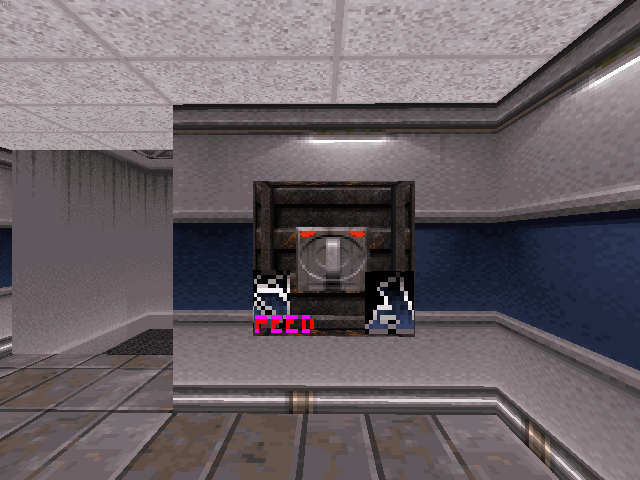
You may notice that all of the doorway sectors are tagged [0,2] and wonder to yourself how we're going to make a door sector here when the sector Lo-Tag is already in use. Simple, we're just going to use the Ceiling Rise/Fall effect instead! Place the following sprites in the door sector: S[0,32], A[0,Channel+4], M[StopSound,StartSound], Speed[0,Speed]. Make sure the S is angled down. For Speed, we want our door to close fairly quickly, so use a value of 1024. StopSound and StartSound are really up to you. I like to use M[380,259] because I'm weird.
Texture the door's frame. Use the O key (the letter O, not zero) on the door frame walls so they won't move up and down with the door.
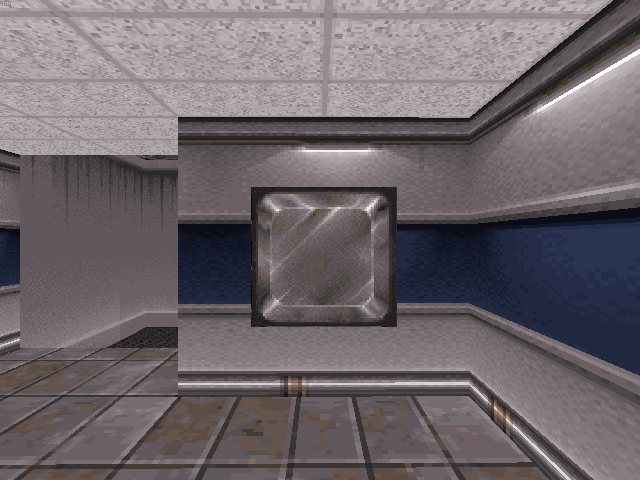
Temporarily lower the door and texture it, then raise it back up.
The procedure for creating the door in the above-water doorway is exactly the same, except the S must be angled up, and the A[0,Channel+4] must be tagged A[0,Channel+3]. Of course, you should also be moving the door sector as close as possible to the above-water airlock sector, but that should be pretty obvious. I typically refer to this door sector as the 'air' door.
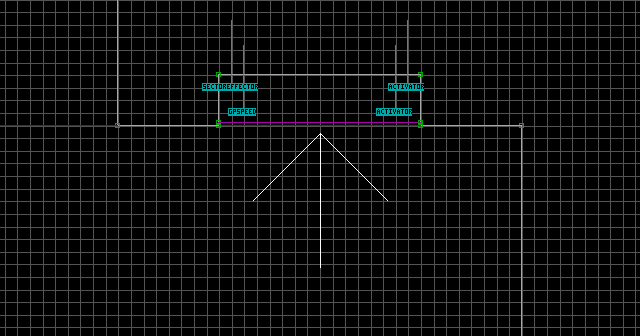
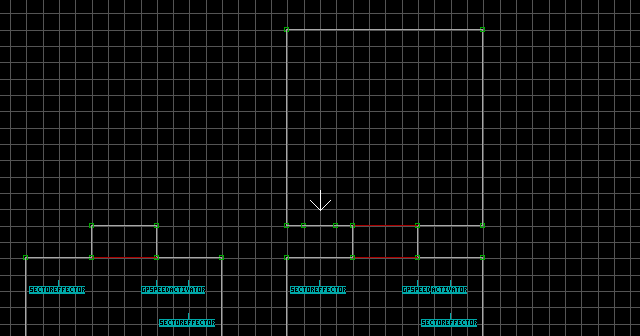
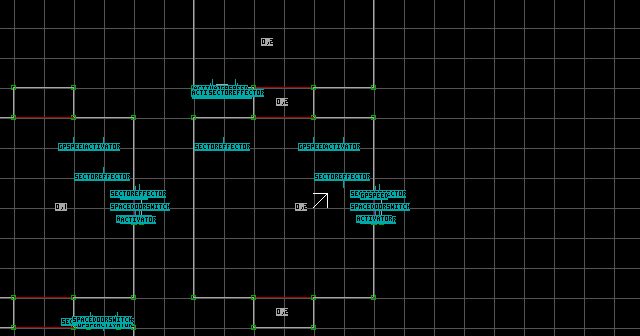
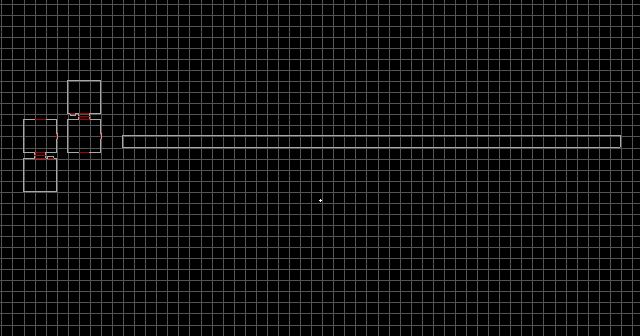
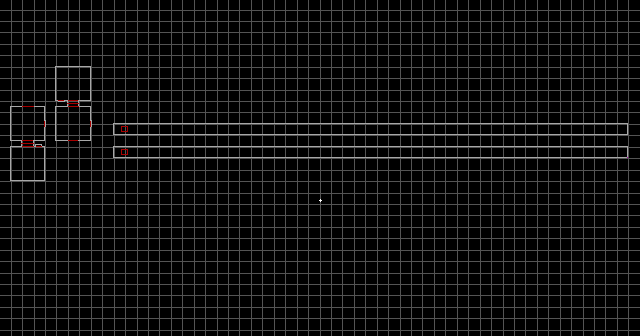
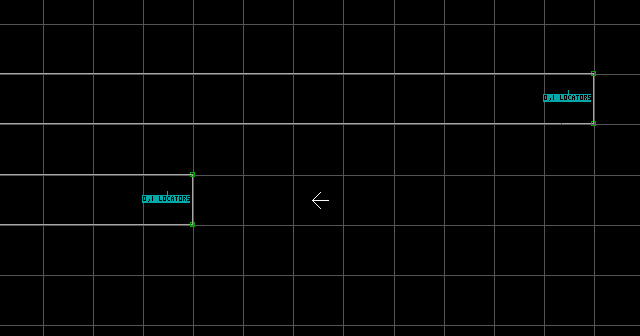
At this point, we are finished building the sectors for the switches, the airlocks, and the doors. That just leaves the Two-Way Trains for timing the entire effect. You might be slapping your face and thinking "What?! Now we have to build those too?!". Surprisingly, this is probably the easiest section of this whole tutorial. Since Two-Way Trains move fairly quickly, and there is no way to control their speed, we are going to build the longest Two-Way Train track possible. Create a sector that is 1 grid square by 45 grid squares on grid size 1 (the largest grid size). This image has the grand distinction of being the furthest zoom-out in the entire guide. The little white arrow is a mere speck in this one.
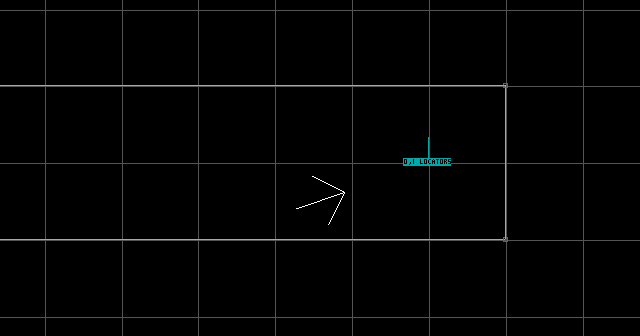
At the East end of the track sector we will place an L+[0,1]. This gets its own snapshot only because I can't fit the entire track sector with visible sprite names in a single snapshot.
At the West end of the track sector we will place an L+[0,0]. This really didn't deserve to be split up into two snapshots.
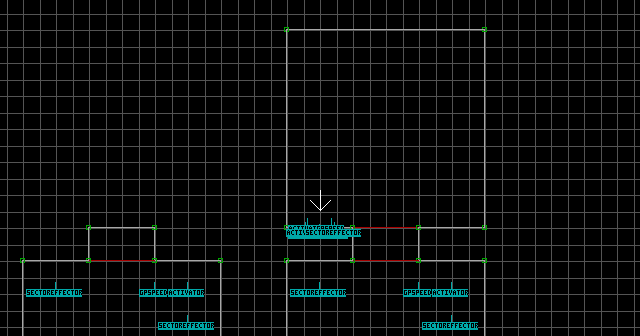
Create a nested sector just in front of the L+[0,0]. This will be the Two-Way Train. Tag it [0,31]. If you want, you can raise the floor of the Two-Way Train by one unit, just to make it easily distinguishable (in case you have to test that it actually works).
Place the following sprites in the Two-Way Train sector: S[Channel+1,30], A[0,Channel]. Angle the S so it faces the front of the train (towards the L+[0,1]). This Two-Way Train will act as the timer for the switch sectors.
Using Right Alt, highlight the entire Two-Way Train track sector and press Insert. Use the Left Mouse Button to drag the copy below the original. Since the player will never see the track sector and floor/ceiling texture alignment is irrelevant, it doesn't matter how many spaces you move the sector. Once the copy has been moved, press Right Alt to make it stop flashing green.
Now use Right Shift to highlight the East end of the copied track sector and its L+[0,1]. Shorten the copied track sector by exactly 8 units on grid size 1 (the largest grid size). Make sure the L+[0,1] also moves accordingly.
In the copied Two-Way Train sector, change the S[Channel+1,30] to S[Channel+3,30]. This Two-Way Train will act as the timer for the airlock doors. Its track is shorter to ensure that the doors will finish opening before the switch sectors open.
We can finally clean up the broken texture alignment in the above/below-water airlock sectors. You may notice that the walls with both an upper and lower portion will not align correctly. You'll have to use the 2 key on the lower portion of these walls to set them as 'separately editable', which will allow you to align the upper and lower portions separately. Now you can test the airlock in the game! When you press a switch, the air door and all of the switches will close, and the airlock chamber will fill up with water. When the airlock is full, the water door will open and then the switches will open. Pressing a switch again will reverse the process.
Notes:
- Gijs de Vries' version of the airlock effect used only one Two-Way Train to time all of the switch sectors and doors. Unfortunately, this method allowed for an annoying problem. If the player activated the switches again too quickly, the Two-Way Train would retrigger before the next airlock door could finish opening. The water would raise/lower again while one of the doors was stuck partially open, ruining the effect. The method used in this tutorial separates the switch sector timing and door timing with two separate Two-Way Trains, and imposes a slightly longer delay on the switch sectors, which ensures that they do not open until after the effect has completely finished.
- The airlock in this demonstration has been designed to begin in the air-filled state (air door open, water door closed). If you'd like the airlock to begin in the water-filled state (water door open, air door closed), simply swap the door sector Activator tags, and inverse the angles of the following four sprites: the
S[0,31]in the above-water airlock sector, theS[0,32]in the below-water airlock sector, theS[0,32]in the air door sector, and theS[0,32]in the water door sector. - I once encountered a strange bug when starting with the airlock in its water-filled state. For some reason, the above-water sector refused to be submergible. I found that raising the above-water
S[Channel+5,7]to match the height of theS[0,31]fixed the problem. I have only encountered this situation once. - The door with the
S[0,32]sprite that is angled down will not open all the way due to a bug. ItsSpeedvalue seems to affect how accurate its opening ceiling height will be, with slower speeds being more accurate. Unfortunately, slower speeds are also more likely to ruin the effect since the door doesn't finish opening/closing before the water reaches it. - There is a limit to how long a wall can be before it starts to develop bugs (these 'long' walls will appear as a different colour in Mapster32 as a visual warning). In this demonstration, the longer Two-Way Train's track sector has been made as long as it possibly can be on grid size 1 before it will be affected by the bug. If you want to increase the time delay of the effect, you can lengthen the track sector simply by inserting points on the walls and then extending the end vertices even further. This avoids the bug because it splits up the 'long' walls into shorter walls.
- Since the doors are constructed using the Ceiling Rise/Fall effect rather than Ceiling Doors, they do not have any safety features built in; They will crush any player who happens to be standing within them when they close. Personally, I just consider this a hazard of the effect, but you can make the door sectors thinner to decrease the chances of this happening.
- The switch sectors also pose the danger of crushing the player, if they're big enough for the player to crawl into. In this demonstration, they are too thin to pose a threat. In the case of switch sectors, this problem can be eliminated completely by just blocking the two-sided wall of the switch sector, like we did in this demonstration.