
That's right, it is possible to make an elevator visit multiple floors! To avoid the confusion of using the word "floor" to mean two different things, I will be referring to the floors as "levels". To keep things simple, I will only be using three levels in this demonstration, but both methods are capable of travelling to more than three levels.
Sprite Method
This method uses a hovering sprite placed in the middle of the elevator, which acts as both the floor and ceiling of the elevator, depending on whether the player is standing on the sprite, or under the sprite. I think the first place I read about this method was in an old Build Tricks document by "Patola".
Create an elevator and three levels. In this example, the sector on the left is the first level, the sector at the bottom is the second level, and the sector on the right is the third level. For this particular setup, the elevator shall be tagged [0,17]. Place an M[StopSound,StartSound] (Speed[0,Speed]) within the elevator. I recommend M[73,71]. Raise the elevator's ceiling 32 PGUP units. Don't alter the height of the elevator's floor. Raise the second level's floor and ceiling 16 units each. Raise the third level's floor and ceiling 32 units each.
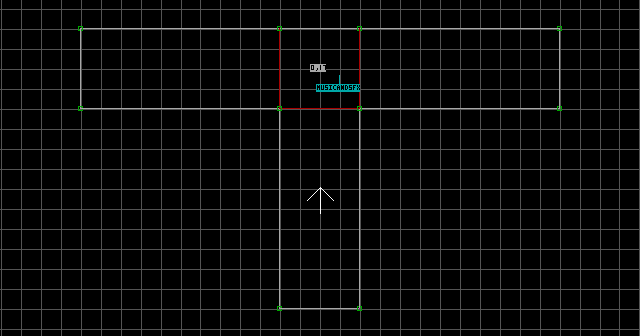
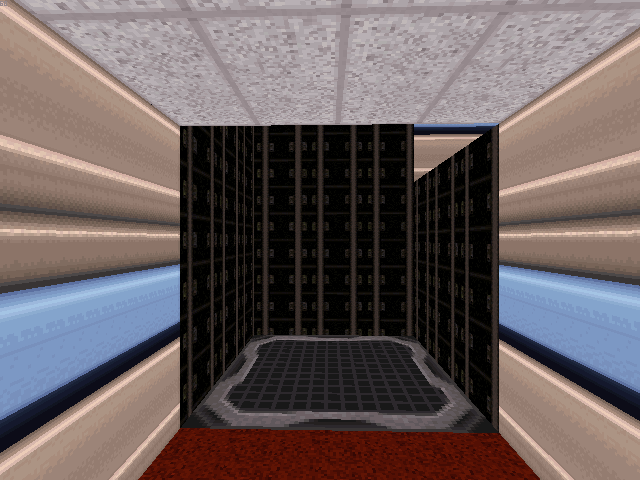
Place a floor-aligned, blocked/hittable sprite within the elevator. Raise it 16 units so it matches the height of the second level's floor. Texture it with an elevator floor texture, and resize it to fit the elevator. In the original game, the sprite will jitter indefinitely after the first activation of the elevator (this bug has been fixed in EDuke32). There are two ways to stop the sprite from jittering in the original game: 1) Reduce the speed of the elevator to values below 64. This drastically hinders the sprite's jittering, although it will still be present. The downside is that the elevator will move unbearably slow. This is the recommended method. 2) Make the sprite 'collapsable' by assigning it a unique Hi-Tag. This will stop the jittering entirely, with the downside that the sprite will be destructible. If the sprite is destroyed, the player will be unable to access the higher levels.
Notes:
- You can use multiple floor-aligned sprites instead of just one to create the elevator floor. Any collapsable sprites sharing the same unique Hi-Tag will fall at the same time.
- The elevator is not limited to three levels. You could use more elevator floor sprites to visit even more levels.
- Elevator floors carry sprites of every relative alignment and position, even sprites which are not touching the floor at all. This makes it possible to construct entire elevators from 'inactive' sprites, then raise them high above the actual elevator floor, giving the impression of a "true" elevator. However, keep in mind that the aforementioned jittering glitch in the original game will affect both floor-aligned and wall-aligned 'inactive' sprites.
Physical Method
This method is more realistic, but is also more complex, as well as being prone to glitches if not done carefully. This method is taken from a document written by "Semicharm", which is available at the Duke Nukem Repository. It is beyond the scope of this guide to attempt to explain Semicharm's entire document in a single page. The following tutorial is just a brief, basic explanation of the effect.
Before we construct this effect, I would just like to explain the concept behind it. This trick takes advantage of the behaviour of elevators which use the sector tags [0,18] and [0,19] (which are functionally identical and can be used interchangeably). When an elevator using one of these tags is activated, it scans adjacent sectors for a floor which is higher than its own. If a higher floor exists, it raises its own floor to match that height. If the elevator doesn't find a higher adjacent floor, then it will instead scan for an adjacent floor lower than its own, and attempt to lower its own floor to match that height. The important point here is that the elevator's floor wants to travel upwards first, and it always wants to do this first.
What this means is that an elevator using one of these tags is already capable of visiting any number of higher levels, without using any tricks. Simply attaching three (or more) higher adjacent levels to it will cause it to visit each one in order (provided that the elevator begins at the bottom level). The problem though, is that the elevator will not be able to descend back down to any level that is lower than the two uppermost levels. So when it finally reaches the highest level, it will simply go back and forth between the two highest levels. In order to work around this limitation, a trick must be implemented. In this case, the trick is to attach a new adjacent sector, and control the height of this sector's floor using a Floor-Rise effect. In Semicharm's document, this sector is called a 'stop' sector.
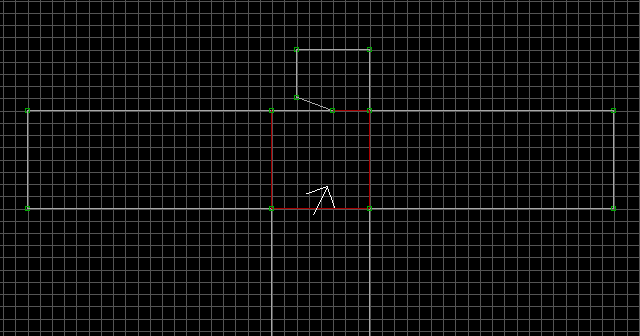
Create an elevator and three levels. In this example, the sector on the left is the first level, the sector at the bottom is the second level, and the sector on the right is the third level. Do not tag the elevator sector yet. Raise the elevator's ceiling 32 PGUP units. Don't alter the height of the elevator's floor. Raise the second level's floor and ceiling 16 units each. Raise the third level's floor and ceiling 32 units each.

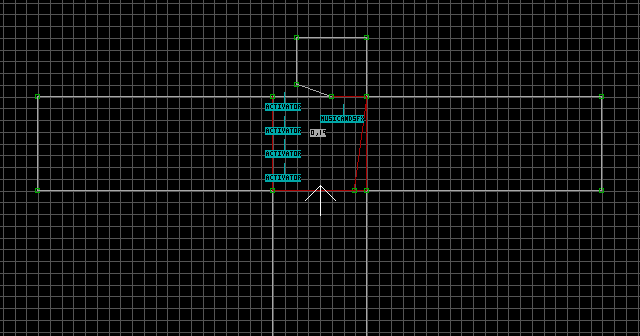
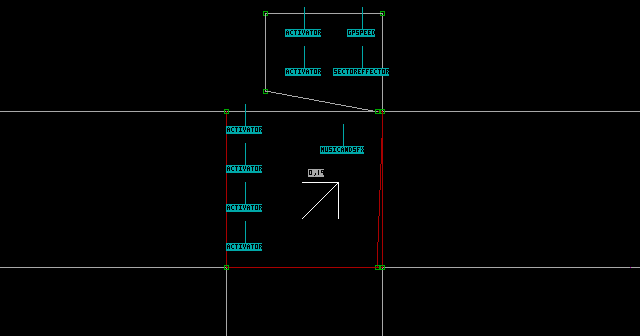
Draw a new sector attached to the elevator sector, in the shape shown in the image. This will be the 'stop' sector.
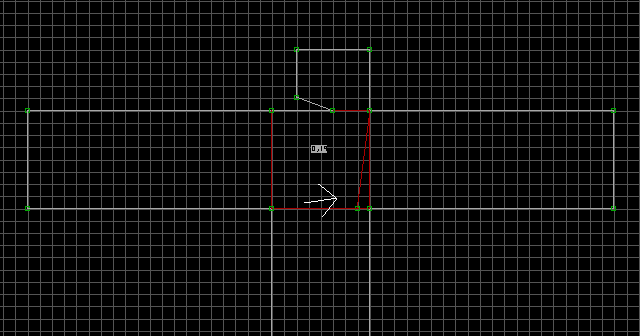
Insert a point on the elevator sector and split it with a triangular shape as shown in the image. The larger half of the split sector will be the actual elevator. Tag only the actual elevator sector either [0,18] or [0,19] (it doesn't matter which tag you use). The reason we are creating this thin sector split is to force the elevator to ignore the third level's floor height. This way, there will only be two adjacent sector floor heights for the elevator to respond to by default (the first and second level), and the third adjacent sector will be the controlled 'stop' sector with adjustable height, which will allow us to bring the elevator up to the third level. If we were to skip this step, there would be four adjacent sectors with different heights attached to the elevator, which would interfere with the intended effect.
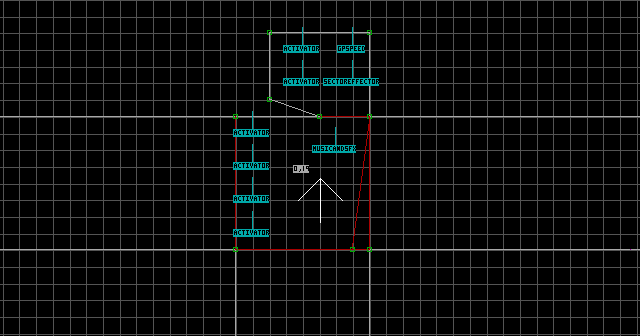
Place the following sprites in the elevator sector: A[0,Channel], A[0,Channel+1], A[0,Channel+2], A[0,Channel+3], M[StopSound,StartSound] (Speed[0,Speed]). I recommend M[73,71].
Place the following sprites in the 'stop' sector: S[0,31], Speed[0,Speed], A[0,Channel], A[0,Channel+2]. Make sure the S is angled up. For Speed, you just need to make sure the 'stop' sector moves faster than the elevator. Unfortunately, there is a bug with the Floor-Rise effect which limits the maximum speed to 1024 (higher values do not guarantee that the 'stop' sector will reach the correct height). This bug seems to have been fixed in EDuke32.
Raise the S exactly 32 units so it matches the height of the third level's floor.
Lower the elevator sector's ceiling exactly 32 units so it matches the height of the first level's ceiling. Do not lower the ceilings of either the thin sector or 'stop' sector, leave them where they are!
Temporarily disable grid locking with L. Make the thin sector as thin as possible, and move the 'stop' sector vertices (the ones attached to the elevator sector) as close together as possible without connecting them. Restore grid locking when you're finished. Of course, they can be moved closer together than shown in the image, I just want to make it clear that they are still separated by a small amount of space.
Place a MULTISWITCH (#146) sprite tagged [ActivationSound,Channel] on the elevator wall that is attached to the 'stop' sector, and also place one on each level the elevator can visit. In the original game, the elevator's multiswitch sprite will jitter indefinitely after the first activation of the elevator (this bug has been fixed in EDuke32). There are a few different ways to hide this jittering in the original game: 1) Reduce the speed of the elevator to a value of 64 or less. This drastically hinders the sprite's jittering, although it will still be present. The downside is that the elevator will move unbearably slow. 2) Remove the multiswitch from the elevator sector, which forces the player to press the individual multiswitches on each level. 3) Hide the multiswitch sprite by making it one-sided and adjusting its angle so it faces the elevator wall. This is the recommended method. Now you can test the elevator in the game.

Notes:
- While it is possible to add more than three levels with this method, it becomes exponentially more complex with each additional level. Read Semicharm's document for details and examples.
- If you want the elevator to begin at the top level, simply change the 'stop' sector activators to
A[0,Channel+1]andA[0,Channel+3]and raise the elevator's floor/ceiling and multiswitch accordingly. - If the player begins the map touching the elevator sector floor, it will trigger the elevator, but not the 'stop' sector. This causes the effect to malfunction for the first two activations (it will only travel to two levels). After the first two activations, everything will work properly again.
- If you want, you can also make the stop sector pitch black by using the
BLANK(#3026) texture.