
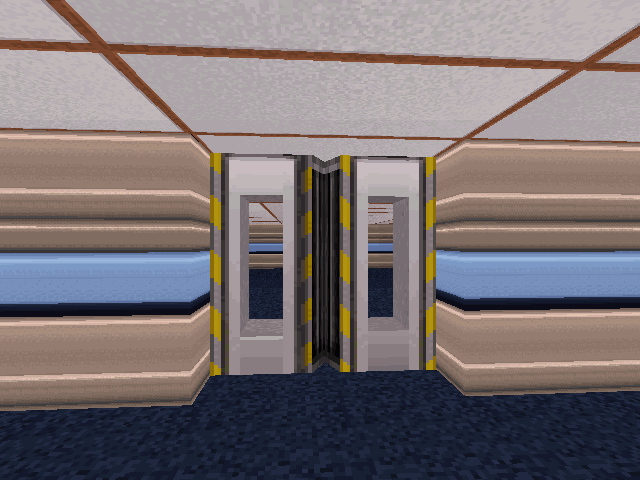
This is infamously the most complex door to construct. Many tutorials provide a map and just say "pull it apart". Essentially the Sliding Door is just a Star Trek Door with two benefits: 1) The door textures do not squish into the wall, and 2) There are no bugs regarding the door's activation sounds.
Single Sliding Door
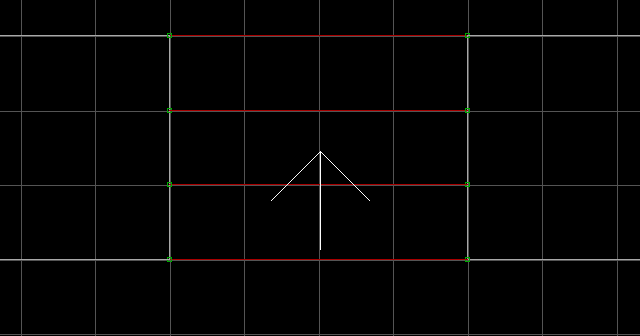
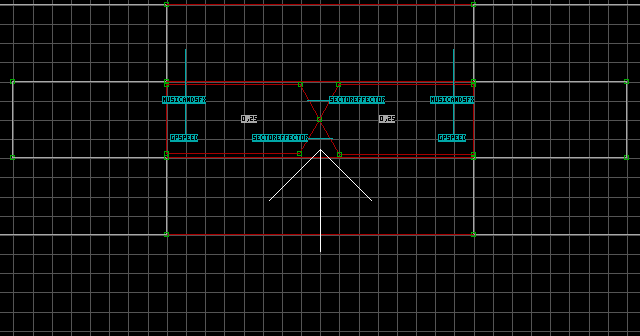
Begin by creating a doorway sector.
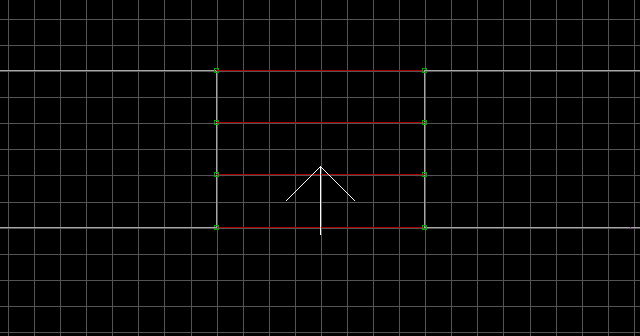
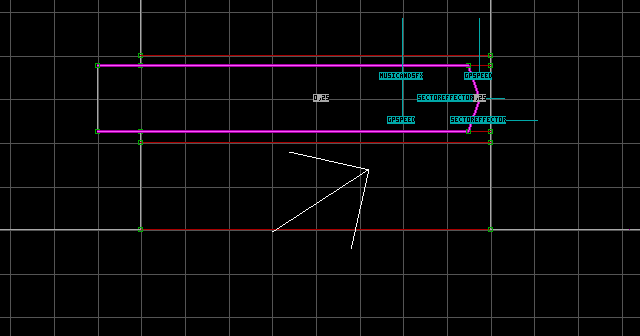
Switch to the smallest grid size and split the doorway sector as shown in the image. The larger half of the split sector will be the actual door sector. Tag it [0,25].
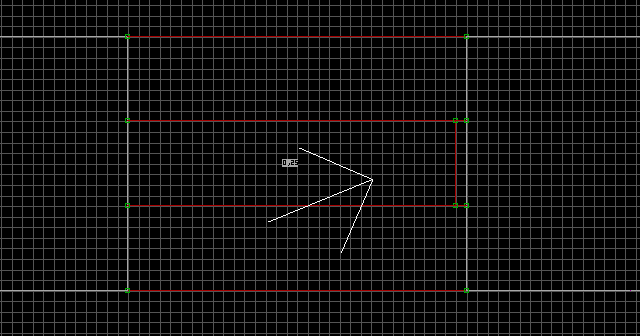
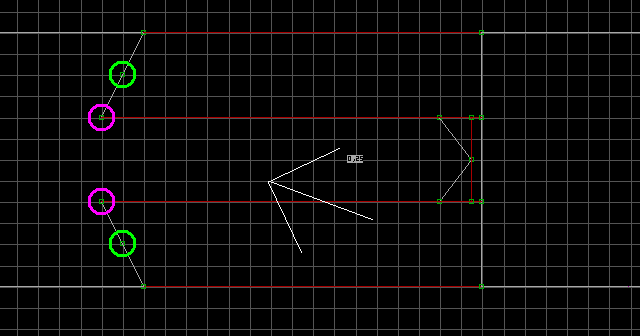
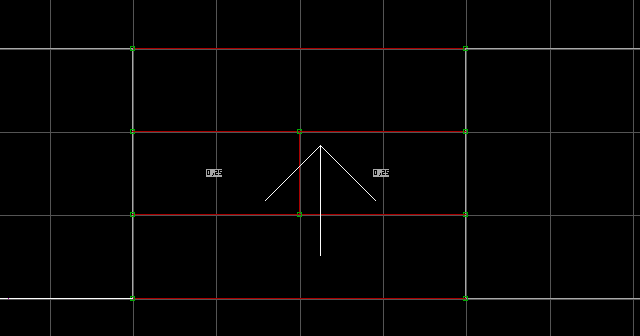
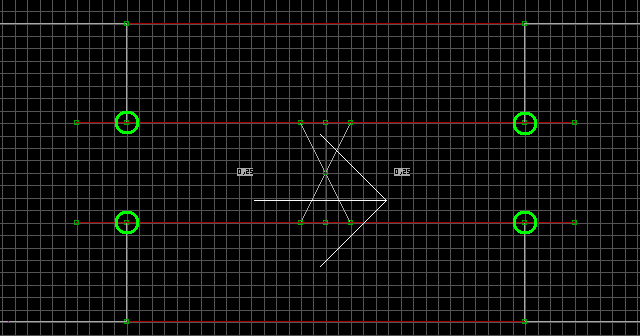
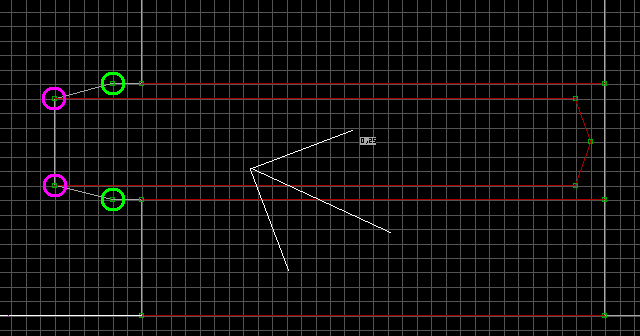
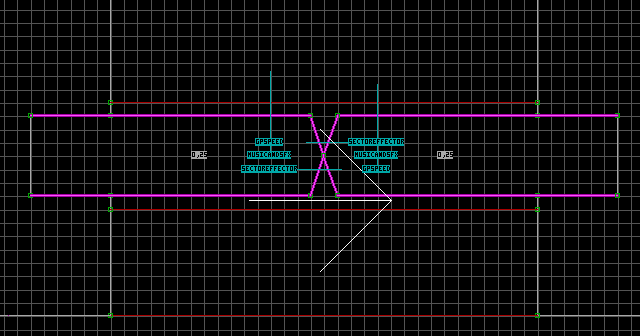
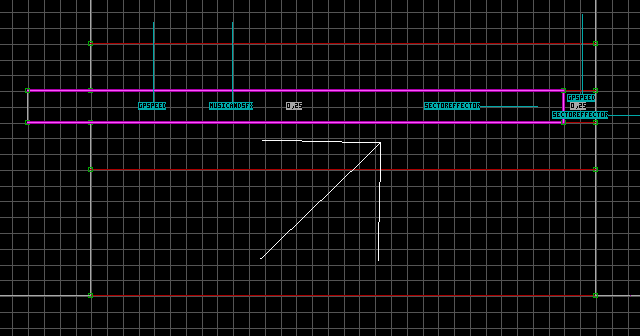
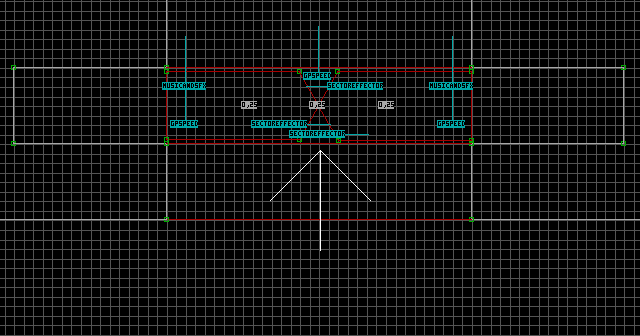
Insert three vertices on the one-sided wall of the door sector. They are colour-coded to help you keep track of where they are moved in the next step.
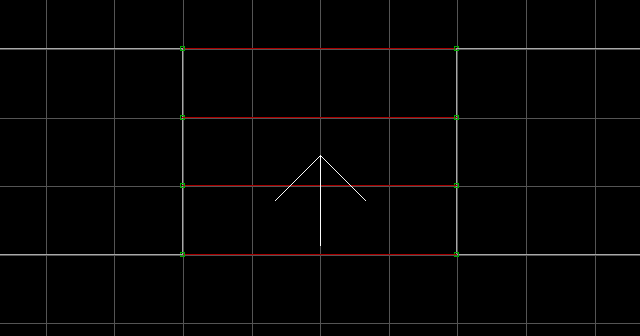
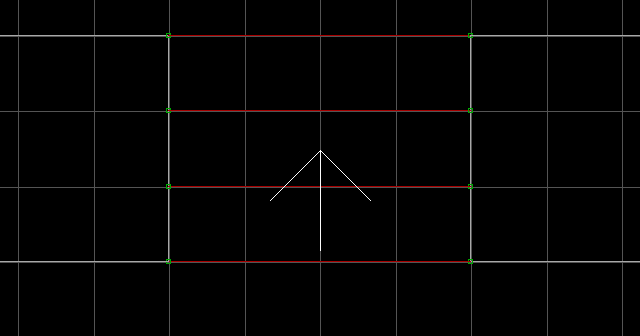
Move the vertices as shown in the image. Make sure the door has the triangular tip as shown in the image. The pink vertices will be moved in the next step.
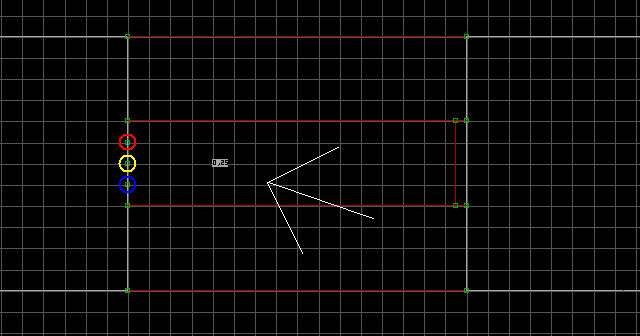
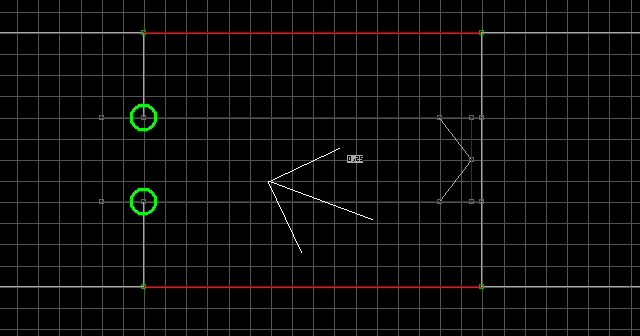
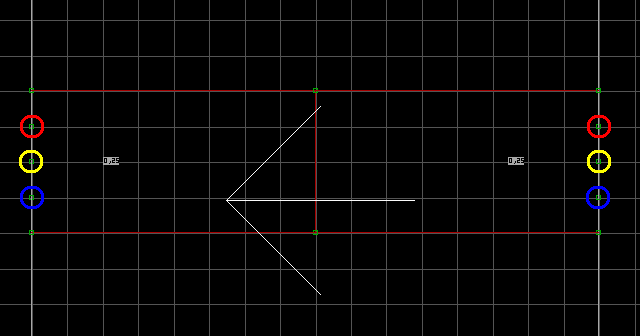
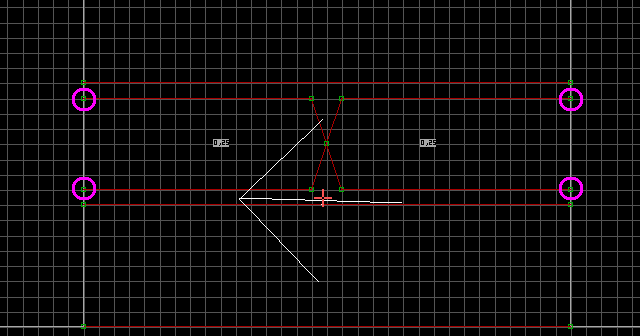
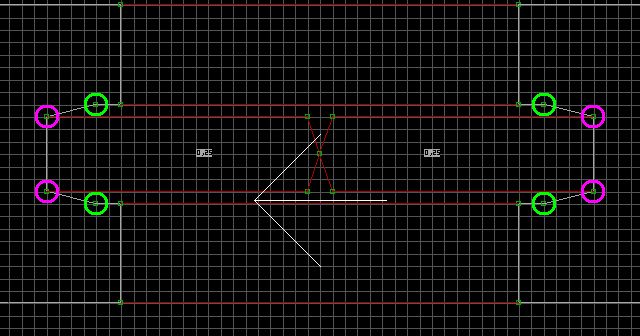
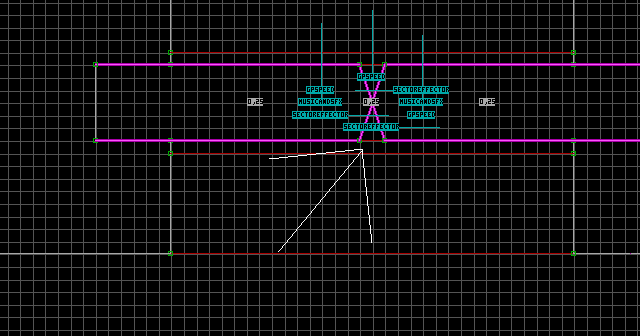
Pull back the pink vertices a few squares. A one-sided wall will be attached to each of them. Insert a vertex on each one-sided wall with Insert (newly inserted vertices are shown as green).
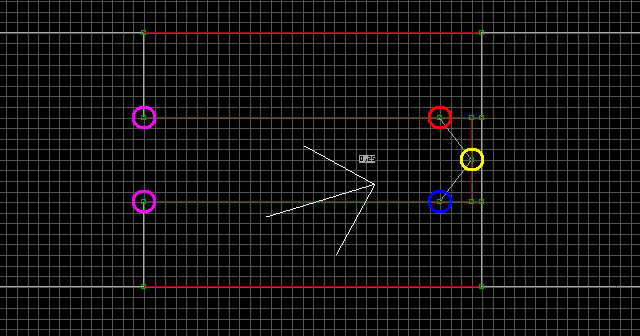
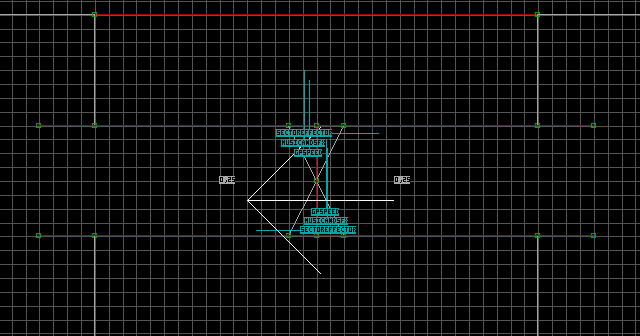
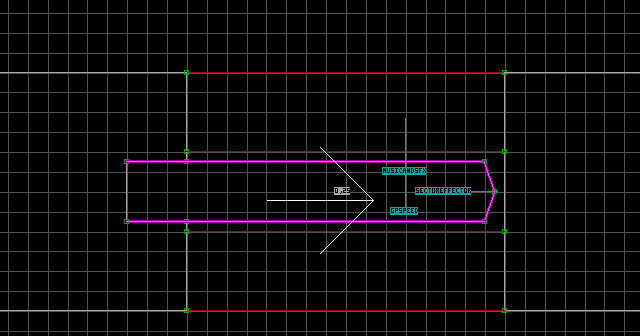
Now move the green vertices to the points shown in the image.
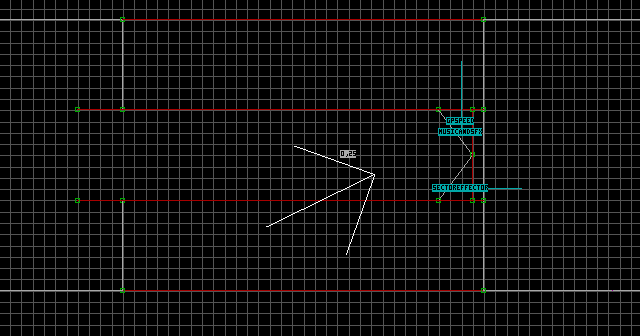
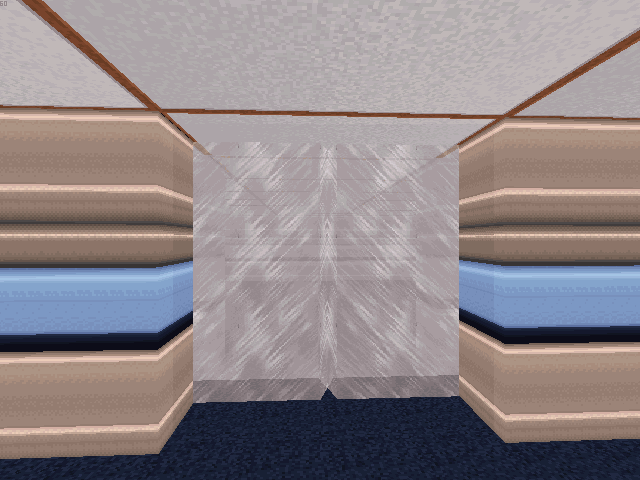
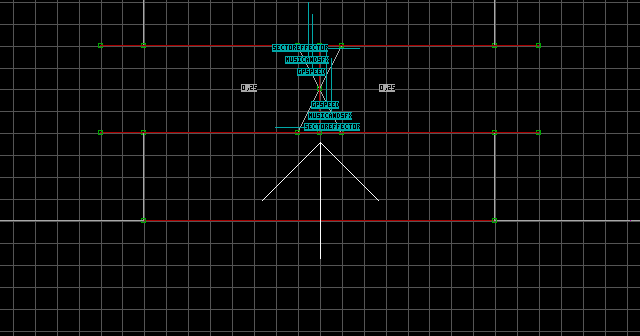
Finally, you'll be adding sprites to the tiny portion at the end of the door sector. This is the reason the end of the door needed to be triangular, so there would be room left to add sprites. Turn grid locking off with L, and add the following sprites to the door sector: M[StopSound,StartSound], S[UniqueChannel,15], Speed[0,DistanceToOpen]. The DistanceToOpen value for the Speed indicates how far back the door will slide into the wall. A value of 512 is equal to the size of the largest grid square. Change the angle of the S so it faces the direction that the door will close. This is the method of construction used in the official maps, so at this point you can texture the door and test it in the game.
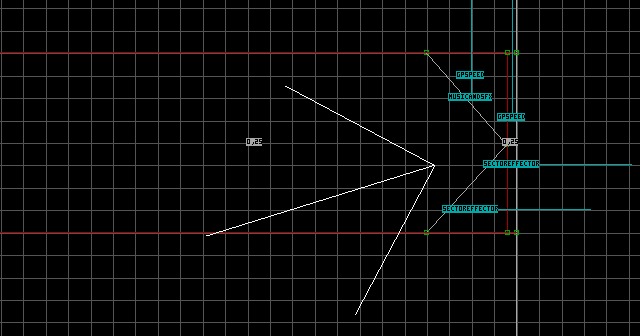
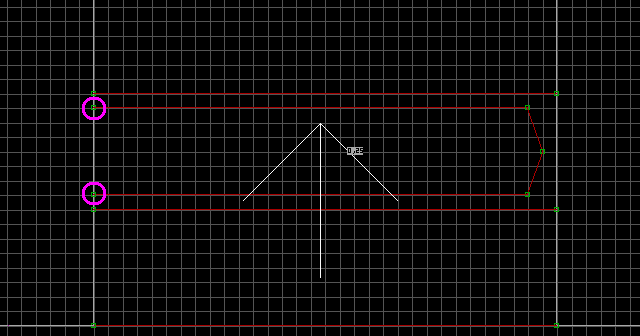
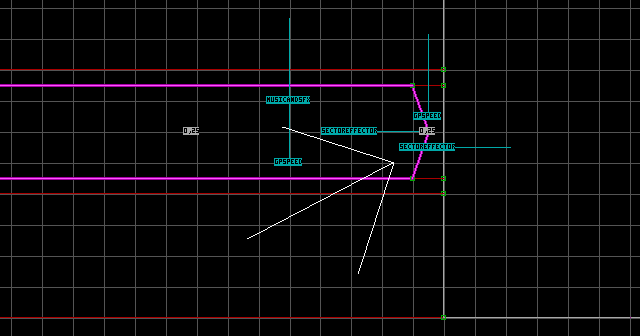
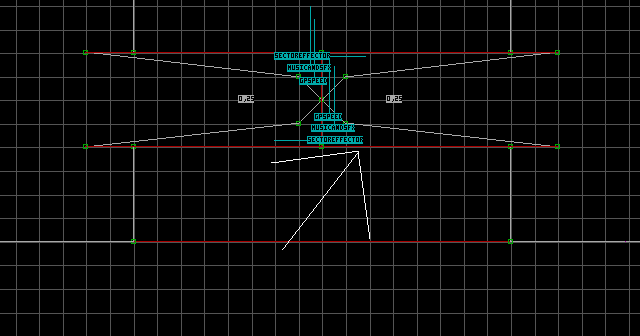
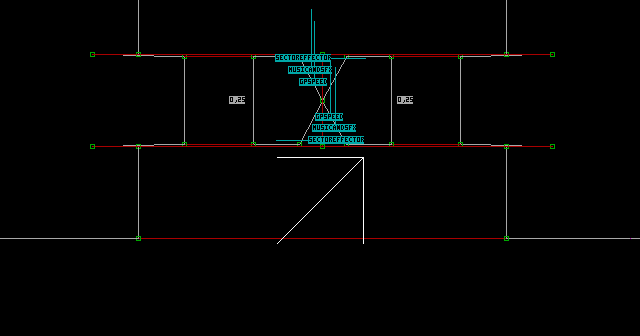
Now for optimizations. You may notice that you cannot close the door unless you are facing it directly. To fix this problem, tag the thin sector that is attached to the end of the door [0,25]. Place the following sprites in this thin sector: S[UniqueChannel,15], Speed[0,DistanceToOpen]. The S sprite must share the same unique Channel value as the other S sprite, but its angle is irrelevant (technically, it should be parallel with the other S sprite). The Speed sprite must use a DistanceToOpen value of 0. This will ensure that pressing on the doorway will trigger the door, without moving the doorway itself! If you want to hide the gap at the end of the door, turn grid locking off with L and make the thin sector even thinner, then move the triangular tip of the door closer to the thin sector.
Dual Sliding Doors
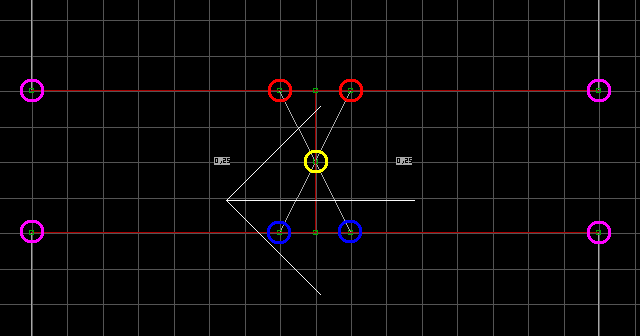
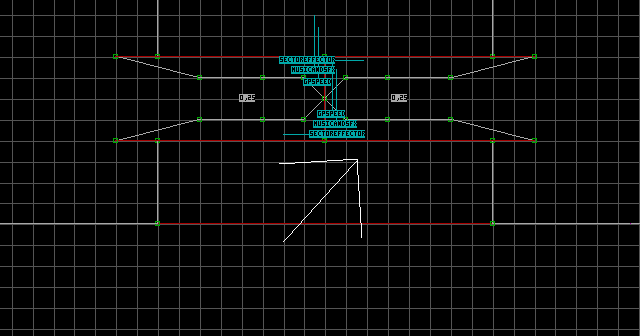
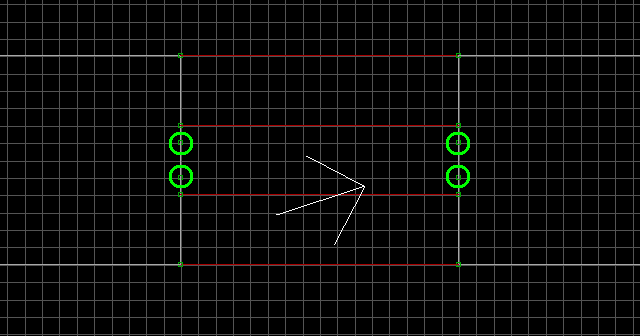
Create the door sector and tag it [0,25]. Split it in half for dual doors. When you split it, both sectors should retain the tag (make sure they do).
Insert three vertices on each one-sided wall. They are colour-coded to help you keep track of where they are moved in the next step.
Move the vertices as shown in the image. The two yellow vertices will overlap in the middle. The pink vertices will be moved in the next step.
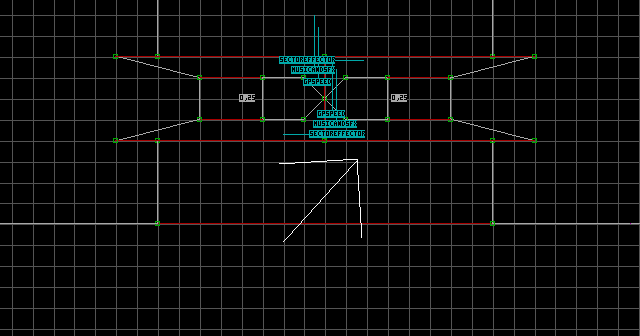
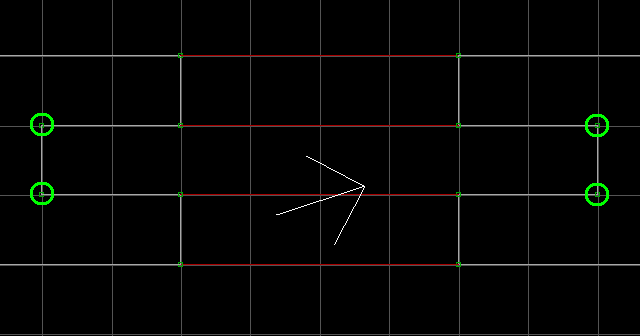
Move the pink vertices back a few squares. A one-sided wall will be attached to each one. Press Insert on each one-sided wall to insert a new vertex (newly inserted vertices are shown as green).
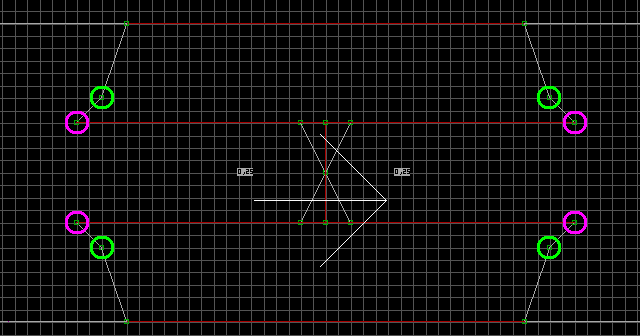
Now move the green vertices to the points shown in the image.
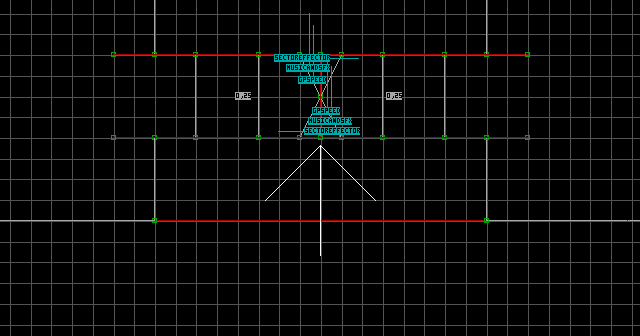
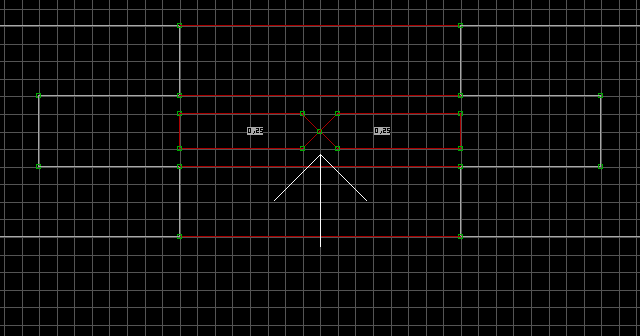
Turn grid locking off with L, and add the following sprites to each door sector: M[StopSound,StartSound], S[Channel,15], Speed[0,DistanceToOpen]. The Channel is a unique value which both S sprites will share. The DistanceToOpen value for the Speed indicates how far back each door will slide into the wall. A value of 512 is equal to the size of the largest grid square. Change the angle of each S so they face the direction that each respective door will close. Finally, you can texture the doors and test them in the game. This is the method of construction used in the official maps.
Single Sliding Glass Door
Begin by creating a doorway sector.
Now create a door sector inside the doorway which almost reaches the other end (the triangular tip at the end of the door isn't necessary, I'm just being consistent). Tag the door sector [0,25]. The pink vertices will be moved in the next step.
Move the pink vertices back a few squares. A one-sided wall will be attached to each one. Press Insert on each one-sided wall to insert a new vertex (newly inserted vertices are shown as green).
You're finished with the pink vertices. Move the green vertices to the points shown in the image.

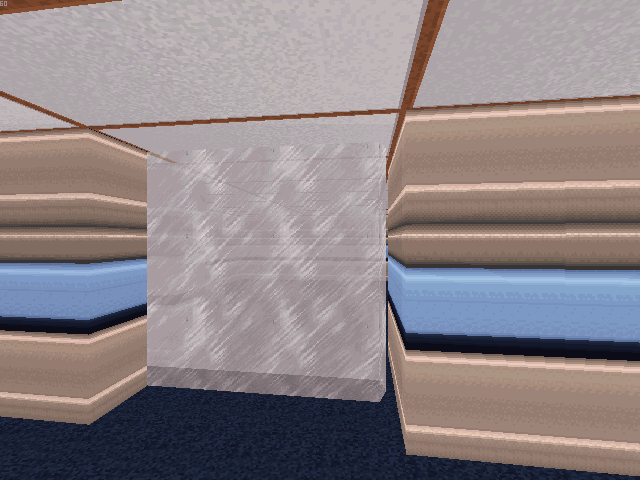
Enter 3D mode. Press M on the ground just below where the door should be. If you got it right, the brown brick texture will pop up, and there will be a small gap at the end of it (heed the small gap, it's your assurance that you masked the right wall). Texture the masked wall with glass. (#503) is breakable, and (#504) is unbreakable. Use T to make it transparent. Mask all sides of the door (including the end of it) with transparent glass textures.
Once the door has glass on all sides, switch to 2D mode. Highlight each of the door's walls and press B, then Ctrl + H to make the walls blocked and hittable. Place the following sprites within the door sector: M[StopSound,StartSound], S[UniqueChannel,15], Speed[0,DistanceToOpen]. For DistanceToOpen, a value of 512 is equal to the largest grid square. Change the angle of the S so it faces the direction that the door will close.
At this point, the door is already finished. However, you may notice that you cannot close the door unless you face it directly. If you would like to fix this problem, insert vertices on the wall next to the door sector and join them to the door sector as shown in the image. The two new walls which are created will share attributes of the glass door, so you must unblock them (with B in 2D mode) and unmask them (with M in 3D mode). Tag this new sector [0,25]. Place the following sprites in the new sector: S[UniqueChannel,15], Speed[0,DistanceToOpen]. The S sprite must share the same unique Channel value as the other S sprite, but its angle is irrelevant (technically, it should be parallel with the other S sprite). The Speed sprite must use a DistanceToOpen value of 0. This will ensure that pressing on the doorway will trigger the door, without moving the doorway itself!
Dual Sliding Glass Doors
Begin by making your doorway sector.
Create two separate rectangular sectors (they will be your doors). Insert a vertex on the end of each door and then overlap them to shape the doors like triangles (the triangular tip at the end of each door isn't necessary, I'm just being consistent). Your doors should look like the image below. Tag both door sectors [0,25]. The pink vertices will be moved in the next step.
Move the pink vertices back a few squares. A one-sided wall will be attached to each one. Insert a vertex on each one-sided wall as shown in the image (newly inserted vertices are shown as green).
Now move the green vertices to the points shown in the image.

Enter 3D mode and use masked walls to surround your doors with glass textures. (#503) is breakable, and (#504) is unbreakable. Use T to make them transparent.
Switch to 2D mode and make all of the masked walls blocked and hittable (using B and Ctrl + H). Add the following sprites to each door sector: M[StopSound,StartSound], S[Channel,15], Speed[0,DistanceToOpen]. The Channel is a unique value which both S sprites will share. The DistanceToOpen value for the Speed indicates how far back each door should slide into the wall. A value of 512 is equal to the size of the largest grid square. Change the angle of each S so it faces the way that respective door will close.
At this point, the doors are already finished. However, you may notice that you cannot close the doors unless you face one of them directly. If you would like to fix this problem, connect the door sectors together as shown in the image. The two new walls which are created will share attributes of the glass doors, so you must unblock them (with B in 2D mode) and unmask them (with M in 3D mode). Tag the new sector in the middle [0,25] (it is just one new sector since the vertices in the middle are merely overlapping). Place the following sprites in the new sector: S[Channel,15], Speed[0,DistanceToOpen]. The S sprite must share the same unique Channel value as the other S sprites, but its angle is irrelevant (technically, it should be parallel with the other S sprites). The Speed sprite must use a DistanceToOpen value of 0. This will ensure that pressing on the doorway will trigger the doors, without moving the doorway itself!
Sliding Window Doors
It is also possible to add windows to Sliding Doors. This example begins with a set of functional Dual Sliding Doors (although you could also use a Single Sliding Door instead).
The first step is to drag the top and bottom vertices of each door inward a bit so we can get access to the one-sided walls.
Now we must insert four vertices per door. These vertices will be the basis for our windows in the next step.
Draw a rectangle in each door sector to connect the newly inserted vertices for that door. These sectors will be the windows.
All new/moved vertices can now be dragged outward to reshape the door sectors as they were at the beginning. You can also reposition/resize the window sectors to your liking.
Now, in order to avoid a lot of potential graphical issues, I recommend turning grid locking off with L, and moving all of the window sector vertices inwards a tiny bit so they do not overlap the red two-sided walls of the doorway sector. You can also move the top and bottom door vertices inwards a bit just to keep the walls relatively straight.
The remaining work is purely cosmetic, so let's switch to 3D mode. Raise the floor and lower the ceiling of each window sector by a few units. Texture the door and window sectors. Use the R key on each window sector's floor/ceiling to make them move with the door. Optionally, you can mask a glass texture over the windows, and make the glass blocked and hittable (using B and H in 3D mode). Texture (#503) is breakable, and (#504) is unbreakable. Now you can test the doors in the game.
Sliding Mirror Door
It is even possible to turn a Sliding Door into a mirror. This example begins with a functional Single Sliding Glass Door (it is not possible to build Dual Sliding Mirror Doors since the two mirrors would interfere with each other). Notice that the optional sector at the end of the door is already included, so the door can be closed without having to face it. This has the added benefit of avoiding problems later (masked texture tend to want to apply themselves to new walls, so if the optional sector were to be attached later, the mirror texture would possibly have to be manually removed from the new walls).
Remove the triangular tip at the end of the door by overlapping it with a nearby door sector vertex. Now make both sectors thinner. You will likely have to rearrange the sprites to make them fit within the sectors. Choose the side of the door you would like to be the mirror, and mask that wall as a 'solid' one-sided masked wall (use the 1 key). Change it to the MIRROR texture (#560) and make it blocked and hittable. Basically, this transforms the door sector into a combination of a Sliding Door and a 'behind-the-mirror' sector. The door will work now, but it will have an ugly HOM effect within the door sector. To hide the HOM effect, make sure the other masked walls are not transparent or using a texture that can be seen through. I usually use wooden textures.
Note: When a mirror is destroyed, it displays the texture MIRRORBROKE. You may notice that the broken mirror texture is not properly aligned. To fix this, temporarily swap the MIRROR texture with MIRRORBROKE (#70), align it however you want, then swap it back to the MIRROR texture.
The Modern Sliding Door
By popular demand, I have been persuaded to include this 'modern' method of constructing Sliding Doors. It is generally considered to be easier to build, while also being more flexible. This method can be used to create either single or dual doors. In this example, we will create dual doors.
Begin by creating a doorway sector.
Insert vertices on both sides of the doorway sector, as shown in the image (newly inserted vertices are shown as green).
Extend the doorway sector by moving the green vertices to the points shown in the image.
Create two separate rectangular sectors (they will be your doors). Insert a vertex on the end of each door and then overlap them to shape the doors like triangles (the triangular tip at the end of each door isn't necessary, I'm just being consistent). Tag both door sectors [0,25].
We want to ensure the doors are thin enough to slide into the doorway sector, but at the same time, we want the doors to be as wide as possible to make the effect look better. To achieve this balance, disable grid locking with L, and move the door sector vertices as close as possible to the doorway sector boundaries, as shown in the image below. Avoid overlapping the walls or vertices, otherwise visual glitches will be highly likely to occur.

Switch to 3D mode. While you have the opportunity, texture your doorway sector. At this point, you have quite a bit of flexibility in how you choose to design the doors. You could raise each door sector's floor to the ceiling (optionally leaving a gap), lower each door sector's ceiling to the floor (optionally leaving a gap), or just mask each door sector's walls (optionally using special textures). You could even combine all three choices! Once you have decided, finish texturing the doors. If you want a door sector's floor and/or ceiling to move with the door, use the R key on it. If you choose to use masked walls, make them blocked and hittable (using B and H in 3D mode).
Switch back to 2D mode. Add the following sprites to each door sector: M[StopSound,StartSound], S[Channel,15], Speed[0,DistanceToOpen]. The Channel is a unique value which both S sprites will share. The DistanceToOpen value for the Speed indicates how far back each door will slide into the wall. A value of 512 is equal to the size of the largest grid square. Change the angle of each S so they face the direction that each respective door will close. Now you can test the doors in the game.
Now for optimizations. You may notice that you cannot close the doors unless you are facing them directly. To fix this problem, tag the doorway sector [0,25]. Place the following sprites in the doorway sector: S[UniqueChannel,15], Speed[0,DistanceToOpen]. The S sprite must share the same unique Channel value as the other S sprites, but its angle can differ since it will have no effect (technically, it should be parallel with the other S sprites). The Speed sprite must use a DistanceToOpen value of 0. This will ensure that pressing on the doorway will trigger the doors, without moving the doorway itself!
Notes:
- If you want to create a single door using this method, exclude one of the doors and its corresponding doorway extension. You may want to adjust the length of the remaining door, in which case you should also adjust the length of its corresponding doorway extension, as well as the remaining
Speedsprite'sDistanceToOpenvalue. - Do not try to extend the doorway sector by drawing new sectors attached to it and then using the 'join' function. This is likely to result in map corruption, because the engine doesn't seem to consider the new sectors to be adjacent. This is why we inserted new vertices and reshaped the sector instead.
- All Sliding Doors are capable of "carrying" nested sectors, but this type of Sliding Door makes them particularly easy to implement. Apparently, nested sectors within Sliding Doors do not require any sector tags or sprites in order to function. Be warned though: Aside from the 10 intangible special sprites, Sliding Doors never carry sprites!
- Due to its inherent flexibility, this type of Sliding Door could easily be transformed into Sliding Glass Doors, Sliding Window Doors, or a Sliding Mirror Door.